Using Multiple Accounts with Azure
If you’re anything like me you’ve got more than one account you use to access Azure, be this personal and work accounts, a dedicated admin account separate from your day to day account, or working with multiple customers with different Azure tenants. Regardless of how many accounts you’ve got, working with more than one can be a pain - ensuring you are logged into the right account and running commands under the proper context. In this article, we’ll look at various techniques you can use to make this a bit easier. We’ll split this into two sections, using the portal and then the CLI/PowerShell.
Azure Portal
Multiple Account Sign-In
The Azure portal supports signing in with multiple accounts and switching between them directly in the portal if the accounts your using support it. If you click on the top right where your username is you will see an option to “Sign in with a different account”, if you click on this you can sign in and have the option to switch between them in the portal.
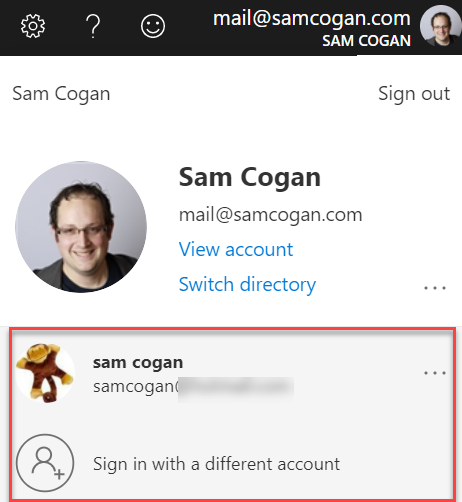
You can use this menu to switch between accounts; you can even have a different account selected per tab in your browser. I would recommend switching the background colour to ensure you know which tab is which account.
Whilst this is the most straightforward approach, it doesn’t always work, depending on how your account is configured. This is particularly true if you’re using ADFS or similar to get SSO with Azure and your main account, you may find that trying to add another account gets you in a loop logging back into your main account.
Browser Profiles
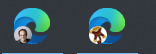
If you can’t use the portal switcher or want a bit more segregation and visibility of which account you are using, you can look at using different browser profiles. Most modern browsers can configure multiple profiles which have their own settings, browser data and so on. For example, in Edge, I have a work and a personal profile created, one signed into my Azure AD account, the other with my Microsoft account.
This then means I can have two instances of Edge running, one with each profile. Edge has a nice indicator of which profile I am signed into to tell which account I am using easily.
Account Containers
This option is only available if you are using the Firefox browser, but it’s worth mentioning as it’s a nice feature. This is a combination of the last two, allow you to configure multiple profiles in your browser, but have individual tabs in the same instance use a different profile. You can also colour code tabs, so you know which is using which profile.
Using the Containers Extension you can configure any number of containers with specific names and colours.
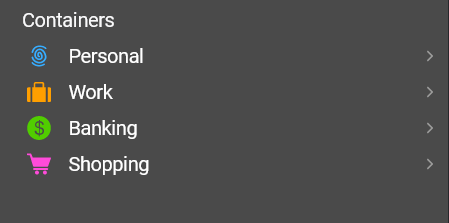
You can then open the portal inside the container and login with the required account, then open a tab with a different container and login with another account. All your profile data is stored inside that container.
This is a pretty nice way of dealing with Azure profiles; it’s just a shame it’s only for Firefox. There are similar extensions listed in the Chrome/Edge plugin store, but none of them really work, and some of them may even be actively trying to steal data, so I recommend you avoid them. The Firefox version is an official Mozilla extension so better trusted.
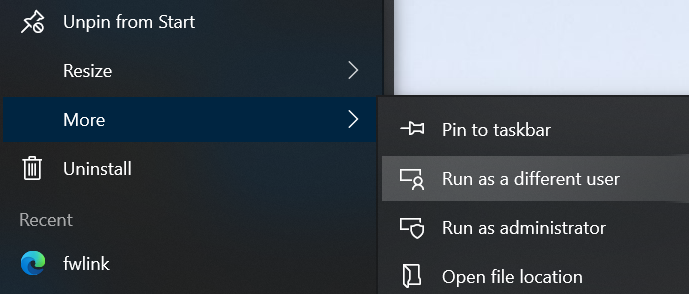
Run As Another User
In some scenarios, mainly where SSO is used, and you have multiple accounts on your AD domain (such as an admin account), the only way you are going to be able to login to the portal with an account that is not your SSO account is to run the browser as a different user. This utilises Windows ability to run an executable as the desired user. This only works if the user you are trying to run as is an account able to run resources on your machine.
You can achieve this by right-clicking on the application, in this case, the browser, going to “more” and then going to “Run as a different user”.
You may find that you are missing this option, if that is the case, I recommend following the steps listed here to enable it.
Once running as the required user, you should log in to the portal using that account. It is also possible to script this if you want to create a shortcut to run as the specific user. The PowerShell below will allow you to create a shortcut which prompts for the required credential then launches the portal as this user.
$cred = (get-credential username)
start-process -FilePath "c:\Program Files (x86)\Microsoft\Edge\Application\msedge.exe" -Credential $cred -ArgumentList "https://portal.azure.com"
This method can also be applied to other applications that you may want to use Azure credentials with, such as SQL Server Management Studio.
CLI/PowerShell
Along with the Portal, you may also need to run CLI commands using different accounts; this is not quite as easy as using the portal.
Cloud Shell
By far, the easiest option is to follow the steps above for launching the portal as the required user, then launching the Cloud Shell from inside that session. This will log you in with the required account, and you can issue the required commands from inside the portal.
Run As A Different User
As with the browser, it is also possible to run the PowerShell or CMD instance as another user authorised on your machine using the “Run As a Different User” command.
Multiple Terminals
Running multiple instances of a terminal such as PowerShell will not help much (unless you use different run as users), as logging in with one account in one window will likely overwrite the user in the other window. However, you can run multiple different terminals, such as PowerShell 5, PowerShell Core, CMD etc., each of which have their own settings and profile. This would allow you to login with different accounts in each. Not an elegant solution, but it would work.
Docker Containers
Microsoft publishes Docker container images that run both Azure CLI and Azure PowerShell. You can use these to create containers running on your machine, which will operate independently and be logged into with separate accounts. It is even possible to run a container image with the full Cloud Shell image in it.
- Azure PowerShell - Docker Hub
- Azure CLI - Docker Hub
- Azure Cloud Shell - microsoft/containerregistry
