Using Managed Identity to Securely Access Azure Resources
Managed Identity (MI) service has been around for a little while now and is becoming a standard for providing applications running in Azure access to other Azure resources. We’re going to be taking a look at using MI in a few areas in the future, such as Kubernetes pods, so before we do, I thought it was worth a primer on MI.
Managed Service Identity has recently been renamed to Managed Identity. If you see a reference to Managed Service Identity or MSI, this is the same service as Managed Identity.
What is Managed Identity?
MI allows you to give a resource in Azure and identity. Once your resource has an identity, it can be granted access to other resources in Azure using that identity, and your application can then use that identity to access these resources.
Let’s take a typical example, Key Vault. Often when you are writing an application, you need to use secrets (connection strings, API keys etc.). A great place to store these is in Azure Key Vault, however, to be able to use these secrets you need to be able to authenticate to Key Vault. Before MI the way this was generally done was to create an Azure Service Principal and use this to access Key Vault from the application. This process has some downsides.
Firstly, the application still needs to be able to retrieve the credentials of the service principal to then access Key Vault, which meant doing one of:
- Storing the username and password in your app settings or similar. This somewhat defeats the purpose of using Key Vault, if the creds to get all the secrets is in your config file in plain text
- Use a certificate to authentication using the Service Principal. This works, but it means that you have to deal with provisioning the cert, getting it on the machine and attaching it to the service principal. You need to repeat all this when it expires
Secondly, you are in charge of managing the service principal. You need to renew any certificates, roll keys regularly, ensure the security of the keys and so on.
With MI Microsoft takes care of a lot of this work for you. When you enable MI on a resource, what happens behind the scenes is that a Service Principal is created in your AD and certificates are assigned. However, you don’t need to deal with any of this, MS create all this for you, and most importantly they handle the regular rolling of credentials and clean up when resources are deleted. From your perspective enabling MI is a single checkbox.
Supported Resources
There are only certain Azure Resources that can have a Managed Identity assigned to them:
- Azure Virtual Machines (Windows and Linux)
- Azure Virtual Machine Scale Sets
- Azure Functions
- Azure App Service
- Azure Data Factory v2
- Azure API Management
- Azure Kubernetes Pods (using Pod Identity project)
To be able to access a resource using MI that resource needs to support Azure AD Authentication, again this is limited to specific resources:
- Azure Resource Manager (to deploy resources)
- Azure Key Vault
- Azure Data Lake
- Azure SQL
- Azure Event Hubs
- Azure Service Bus
- Azure Storage (preview)
So before you start down this route, make sure that the resources you want to use and access support MI.
Setting up Managed Service Identity
To use MI, we need to enable it on a device. However, before we do that we need to pick which type of MI to use, as there are two options:
- System Assigned Managed Identity - This is the simplest option to use and assigns an identity directly to an Azure resource. Each resource gets its own identity, and it is not possible to share identities across resources. The identity is created and tied to the resource when you enable MI.
- User Assigned Managed Identity (currently in preview) - This allows you to create an identity in advance, without tying it to a resource. You can then assign this identity to multiple resources, making it more straightforward if you have lots of resources that need to access the same things. As it is in preview, it does have some known issues, including the fact that currently it can only be assigned to VMs and VM scale sets.
Let’s look at how we set both of these up for an Azure Function that needs to access Key Vault (the process is similar for other resources).
System Assigned Managed Identity
To use System Assigned MI, we enable MI directly on the resource which creates an identity tied directly to this function app (not that any functions within the same app use this identity).
Azure Portal
To enable MI using the portal we browse to the Function App and select the “Platform features” tab. In the “Networking” section you see an option for “Managed service identity”.

Click on this and then change the option for “Register with Azure Active Directory” from Off to On.

PowerShell
Set-AzureRmWebApp -AssignIdentity $true -Name <FUNCTION APP NAME> -ResourceGroupName <RESOURCE GROUP NAME>
CLI
az webapp identity assign --name <FUNCTION APP NAME> --resource-group <RESOURCE GROUP NAME>
ARM Template
To enable MI using an ARM template we add an Identity section and set it to System Assign.
{
    "apiVersion": "2016-08-01",
    "type": "Microsoft.Web/sites",
    "name": "[variables('appName')]",
    "location": "[resourceGroup().location]",
    "identity": {
        "type": "SystemAssigned"
    },
    "properties": {
        "name": "[variables('appName')]",
        "serverFarmId": "[resourceId('Microsoft.Web/serverfarms', variables('hostingPlanName'))]",
        "hostingEnvironment": "",
        "clientAffinityEnabled": false,
        "alwaysOn": true
    },
    "dependsOn": [
        "[resourceId('Microsoft.Web/serverfarms', variables('hostingPlanName'))]"
    ]
}
User Assigned Managed Identity
With user assigned Managed Identities, we are going to create the resource in advance and then assign it to a resource.
Portal
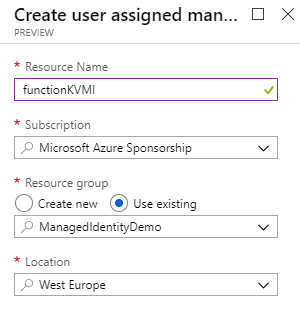
User assigned MI is a top-level resource in the portal, so we go to the “create a resource” button and search for “User Assigned Managed Identity”. Click on create and then we need to give it a name, a resource group and region.
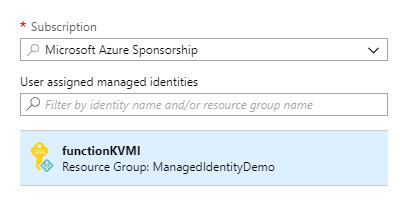
Once we click OK, the MI is created, and you can see it in the portal.

As mentioned above, User Assigned MI can only currently be assigned to VMs or VMSS, which means we can’t use it for this example using a function. We’ll assign this to a VM to show how it works. We select our VM in the portal and then go to the “Identity” option in the “Settings” section.

Once we click on that, we go to the “User Assigned” tab and click “Add”. We are presented with a list of MIs to use, and we can select the one we want and click “Add.”
PowerShell
Creating the User MI
New-AzureRmUserAssignedIdentity -ResourceGroupName <RESOURCEGROUP> -Name <USER ASSIGNED IDENTITY NAME>
Assigning to a VM
$vm = Get-AzureRmVM -ResourceGroupName <RESOURCE GROUP> -Name <VM NAME>
Update-AzureRmVM -ResourceGroupName <RESOURCE GROUP> -VM $vm -IdentityType UserAssigned -IdentityID "/subscriptions/<SUBSCRIPTION ID>/resourcegroups/<RESROURCE GROUP>/providers/Microsoft.ManagedIdentity/userAssignedIdentities/<USER ASSIGNED IDENTITY NAME>"
CLI
Creating the User MI
az identity create -g <RESOURCE GROUP> -n <USER ASSIGNED IDENTITY NAME>
Assigning to a VM
az vm identity assign -g <RESOURCE GROUP> -n <VM NAME> --identities <USER ASSIGNED IDENTITY NAME>
ARM Template
Creating the User MI
To create a User Defined MI you would add a resource with the type of “Microsoft.ManagedIdentity/userAssignedIdentities” and provide a value for the name
   {
      "type": "Microsoft.ManagedIdentity/userAssignedIdentities",
      "name": "[parameters('resourceName')]",
      "apiVersion": "2015-08-31-PREVIEW",
      "location": "[resourceGroup().location]"
    }
Assigning to a VM
Update your VM ARM template to add an Identity section and add the resource ID of the MI you created:
{
    "apiVersion": "2018-06-01",
    "type": "Microsoft.Compute/virtualMachines",
    "name": "[variables('vmName')]",
    "location": "[resourceGroup().location]",
    "identity": {
        "type": "userAssigned",
        "userAssignedIdentities": {
            "[resourceID('Microsoft.ManagedIdentity/userAssignedIdentities/',variables('<USERASSIGNEDIDENTITYNAME>'))]": {}
        }
     }
}
Granting access to the Managed Identity
Now we have created the managed identity we need to grant it access to the KeyVault we want to get our secrets from. At this point there is nothing new, the MI is just another RBAC user, and can be granted access to the resources in the usual manner. So for our KeyVault we would go to the “Access Policies” Section and click “Add New”, we then search for the user we want to add.
For System Assigned MI the service principal is created with the name of the resource, so we search for that.
For the User Assigned MI, we would search for the name we created it with.

We then grant this user whatever rights on KV are required.

Our Managed Identity now has access to Key Vault.

Using Managed Identity in our Application
Now we have MI setup, and with access to our Key Vault, we need to update our application to be able to use it. I’m no developer, so this information is all based on the examples in the documentation. This example is for C# functions, I’ll add some links for other languages below.
To make our life easier, we want to add references to the Microsoft.Azure.Services.AppAuthentication and Microsoft.Azure.KeyVault NuGet packages, this does a lot of the work for us. Using these packages, we then talk to the Azure Management API to get a token using our assigned identity and then use this Token to Authenticate to Key Vault.
using Microsoft.Azure.Services.AppAuthentication;
using Microsoft.Azure.KeyVault;
// ...
var azureServiceTokenProvider = new AzureServiceTokenProvider();
string accessToken = await azureServiceTokenProvider.GetAccessTokenAsync("https://management.azure.com/");
// OR
var kv = new KeyVaultClient(new KeyVaultClient.AuthenticationCallback(azureServiceTokenProvider.KeyVaultTokenCallback));
Now we have a working, authenticated Key Vault client, and we can make calls to that to retrieve the secrets we require.
var sec = await kv.GetSecretAsync(WebConfigurationManager.AppSettings["SecretUri"]);
Other Examples
Using Managed Service Identity (MSI) with an Azure App Service or an Azure Function
Use Key Vault from App Service with Managed Service Identity and Python
app-service-java-access-key-vault-by-msi-for-web-apps
Use Key Vault from App Service with Managed Service Identity and Nodejs
Image Attribution
ParksTennis_270 flickr photo by Codelocks shared under a Creative Commons (BY-ND) license
