Sandboxed Environments with Container Apps Dynamic Sessions
Azure Container apps recently introduced a new preview feature called Dynamic Sessions, which provides the ability to run sandboxed environments in ACA. Dynamic Sessions provides a way to run untrusted code more securely. This includes:
- Sandboxed - containers are run in their own Hyper-V sandbox environment, isolating the container at the hypervisor level. Additionally, network-level isolation can be applied.
- Dynamic creation and scaling - containers are created dynamically based on the unique session ID, and destroyed when no longer used. Containers are only billed for the time running.
- Fast startup - containers are started using a pool of existing hardware to ensure fast startup time
- REST API Access - containers expose a REST API to receive requests and execute whatever code you want to run.
Dynamic Sessions provide a way to run insecure code quickly and securely. It’s clear that a lot of this is aimed at AI workloads, but they can be helpful in any sort of workload where you need to run code that is not in your control or there is a risk of malicious code being run.
Dynamic sessions can run two types of containers:
- Code interpreter services - this runs a pre-created Python LTS container from Microsoft that can run any Python code you send in via the REST API.
- Customer container - run any container workload you require in a dynamic session, so long as you can expose a REST API on the required port
Container Creation
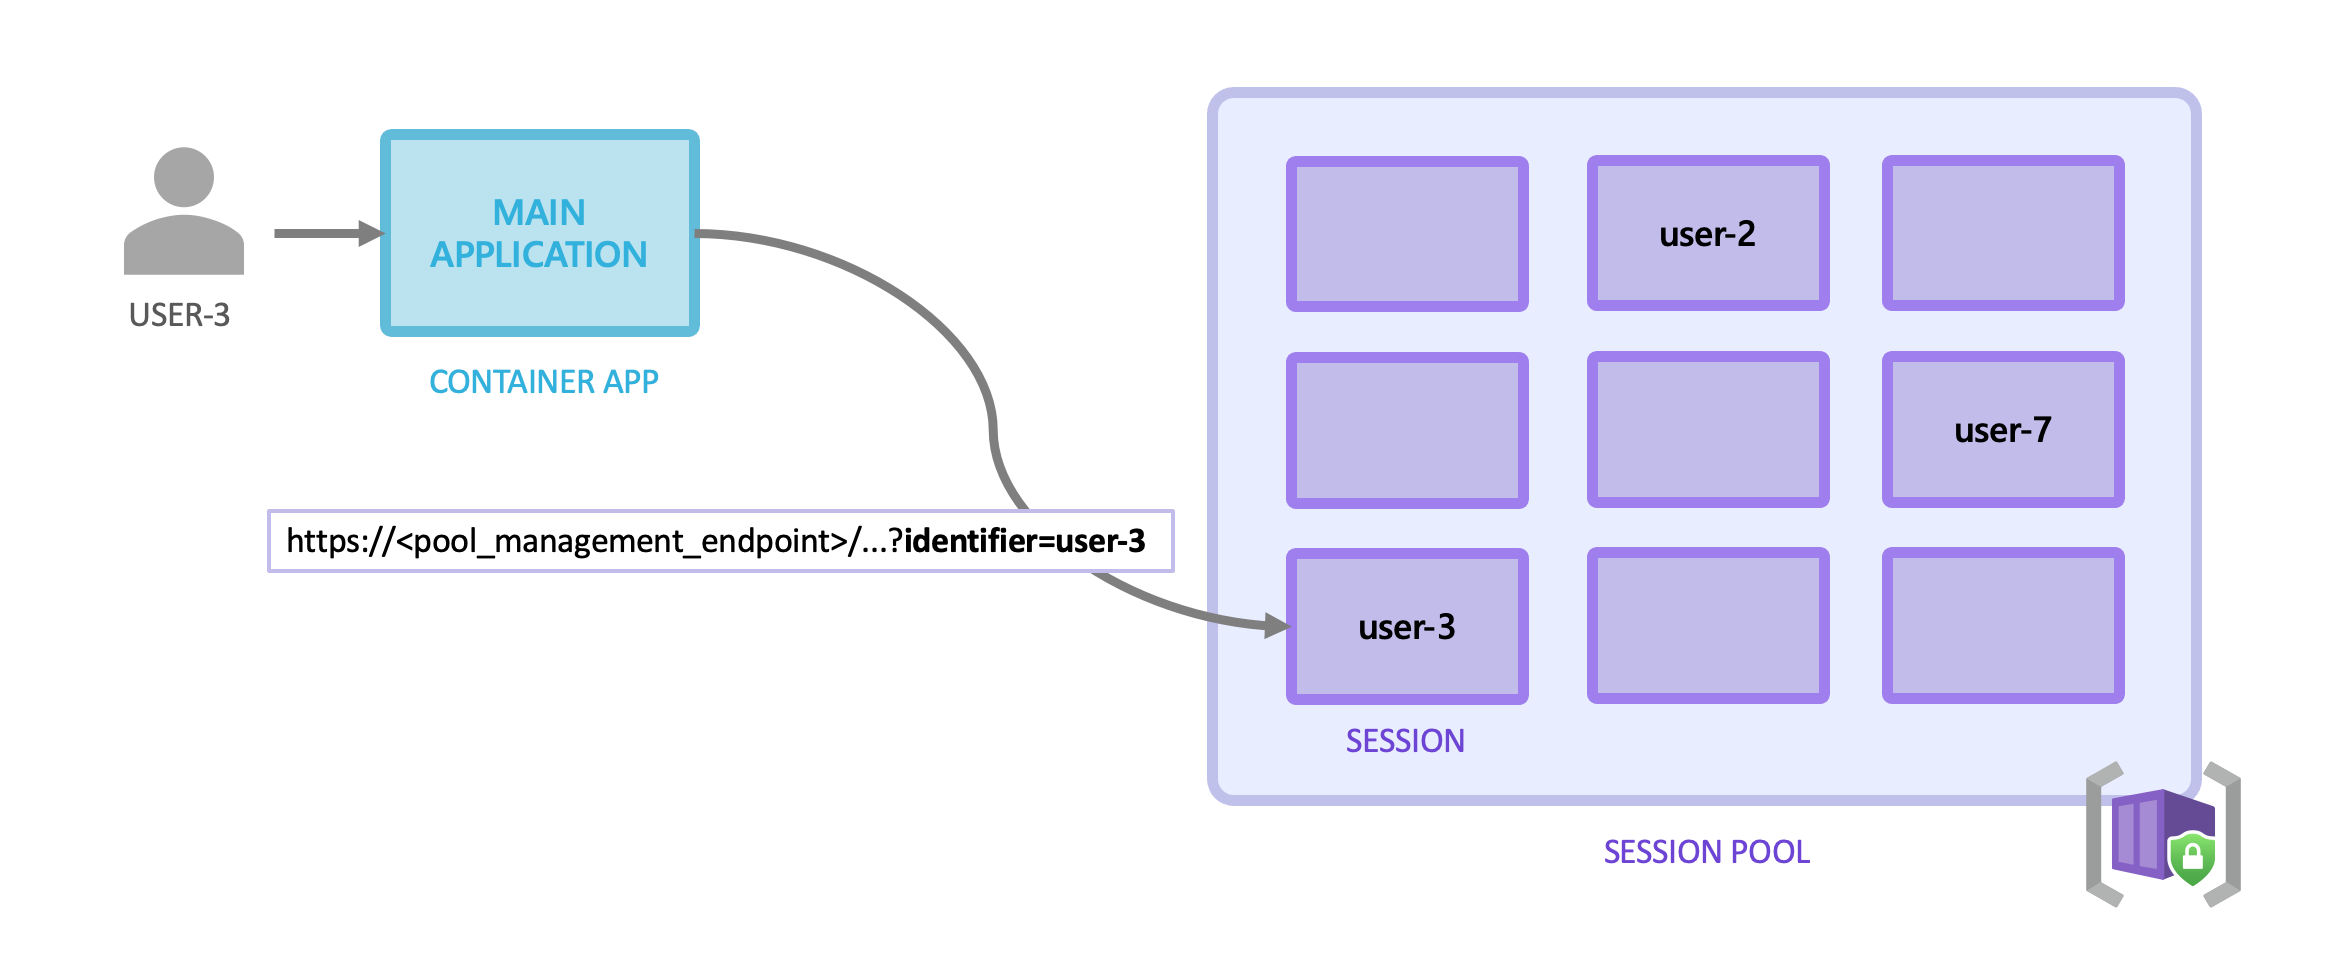
Containers are created dynamically based on the session ID sent in your API request. You send a request to the URL provided by the session pool with a unique session ID in the query string. The session pool evaluates this and determines if this session ID is already in use:
- The request is directed to the existing container if the session already exists.
- A new container is created if the session does not exist, and traffic is directed to this new container.

The session ID is a significant security concern as if a request is made to an existing ID, it will be routed to that container. For this reason, the API application needs to ensure that the session ID is stored securely and securely transmitted to the API. Access to the session pool is also controlled by Entra ID authentication. The session ID is a freeform string; it can be any value you want.
Sessions can be for individual users, but they can also be used for other purposes, such as individual conversations with an AI service.
Security
To call the session pool API, the user, service principle of managed identity needs to be granted the “Azure ContainerApps Session Executor” role.
Creating a Session Pool
To get started with dynamic sessions, you need to create a session pool. The command below creates a session pool using the MS code interpreter image:
az containerapp sessionpool create \
    --name my-session-pool \
    --resource-group <RESOURCE_GROUP> \
    --location westus2 \
    --container-type PythonLTS \
    --max-sessions 100 \
    --cooldown-period 300 \
    --network-status EgressDisabled
Here are a few things to be aware of:
- The container type needs to be precisely “PythonLTS” to use the code interpreter image.
- Max sessions indicate the maximum amount of sessions (and so containers) to create
- The cooldown period defines the number of seconds to wait after there are no requests to the API before the container is deleted.
- Network status defines whether outbound traffic from the container is allowed
Using a custom container uses the same command but with more parameters required:
az containerapp sessionpool create \
    --name my-session-pool \
    --resource-group <RESOURCE_GROUP> \
    --environment <ENVIRONMENT> \
    --registry-server myregistry.azurecr.io \
    --registry-username <USER_NAME> \
    --registry-password <PASSWORD> \
    --container-type CustomContainer \
    --image myregistry.azurecr.io/my-container-image:1.0 \
    --cpu 0.25 --memory 0.5Gi \
    --target-port 80 \
    --cooldown-period 300 \
    --network-status EgressDisabled \
    --max-sessions 10 \
    --ready-sessions 5 \
    --env-vars "key1=value1" "key2=value2" \
    --location <LOCATION>
In particular, you need to define the location of the image to use and any credentials required to access it. If the image is hosted in ACR, then a managed identity can be used rather than providing access credentials. You also need to define the port that the API is running on in your container, as well as CPU and Memory. Finally you can provide any environment variables needed.
The session pool automatically caches your container image to allow for faster startup.
Calling the API
To use the API you will need the management API endpoint URL; you can retrieve this from the CLI:
az containerapp sessionpool show \
    --name my-session-pool \
    --resource-group <RESOURCE_GROUP> \
    --query 'properties.poolManagementEndpoint' -o tsv
You can then use this URL to build the URL you need to execute the code. For the Code Interpreter image, the request sent to the API will include the Python code you want to be executed. For example:
POST https://<REGION>.dynamicsessions.io/subscriptions/<SUBSCRIPTION_ID>/resourceGroups/<RESOURCE_GROUP>/sessionPools/<SESSION_POOL_NAME>/code/execute?api-version=2024-02-02-preview&identifier=<SESSION_ID>
Content-Type: application/json
Authorization: Bearer <token>

{
    "properties": {
        "codeInputType": "inline",
        "executionType": "synchronous",
        "code": "print('Hello, world!')"
    }
}
If you are using an LLM framework such as LangChain, integrations are available to make calling this API easier.
For custom container images, the format of the request will depend on the container. The management API will pass on the request to the container with any path appended to the request.
An example request may look like this:
POST https://<SESSION_POOL_NAME>.<ENVIRONMENT_ID>.<REGION>.azurecontainerapps.io/<API_PATH_EXPOSED_BY_CONTAINER>?identifier=<USER_ID>
Authorization: Bearer <TOKEN>
{
  "command": "echo 'Hello, world!'"
}

