Using Managed Identity with Kubernetes in Azure
If your application is running on a Kubernetes cluster in Azure (AKS, ACS or ACS Engine), then it is likely that you will need to access other Azure resources from your pods that are secured with Azure AD. These operations could include retrieving secrets from Key Vault, files from Blob storage or just interacting with other applications or API’s that use Azure AD as their identity provider. To be able to do this your application needs to be able to provide an identity to access these resources securely.
Up until recently, this has required the use of an Azure Service Principal. A Service Principal is essentially an application created in Azure AD with either a password or a certificate. Using a Service Principal can be a pain as it means that you have to either pass this password to your application or make sure the certificate is loaded. It also means that it is your responsibility to keep this identity secure, roll the keys on a regular basis and so on.
Microsoft’s solution to this is Managed Identity. Managed Identity allows you to assign an Azure AD identity to your virtual machine, web application, function app etc. This identity is then used by your application to access resources. The management of the identity is taken care of by Microsoft; they are the ones rolling the keys and keeping the credentials secure. Most importantly you don’t need to worry about passing in passwords or certificates to your application, you assign the identity to the Azure object, and that is it.
While this works great for VMs and Web apps, it didn’t work with things like AKS in Azure. When you deploy an AKS cluster, the object you see in Azure is the cluster. However, we don’t want to assign identities to the cluster; we want to assign them to individual pods and probably have different identities for different pods. Out of the box, this was not possible, but now with a new open source project called “Pod Identity” we can now achieve this and simplify our application identity workload significantly.
Demo Scenario
For the rest of this article, we are going to look at a simple scenario where we have a pod that needs access to some secrets from Key Vault. We are going to revisit a previous article where we used the Kubernetes Key Vault Flex Volume project to mount Key Vault secrets as volumes on our pods.
In the previous demo, we used a service principal to grant access to our Key Vault resource. This worked, but it meant that we needed to maintain a Kubernetes secret to store our Service Principal password, which needed updating any time this changed or expired. In this demo, we will replace the Service Principal with Managed Identity so that we can let Microsoft take care of managing the lifecycle of that identity.
If you want to follow along with this demo, you may want to start by deploying the Service Principal example in the previous article, so you can then convert it to using Managed Identity.
Deploying Pod Identity
To be able to make use of Pod Identity we need to deploy some resource into our Kubernetes cluster.
Managed Identity Control (MIC)
The Managed Identity Controller is a single pod that watches your running and checks whether they are tagged to have identities assigned to them. If these pods are tagged appropriately, it maintains an identity map connectivity pods to identities
Node Managed Identity (NMI)
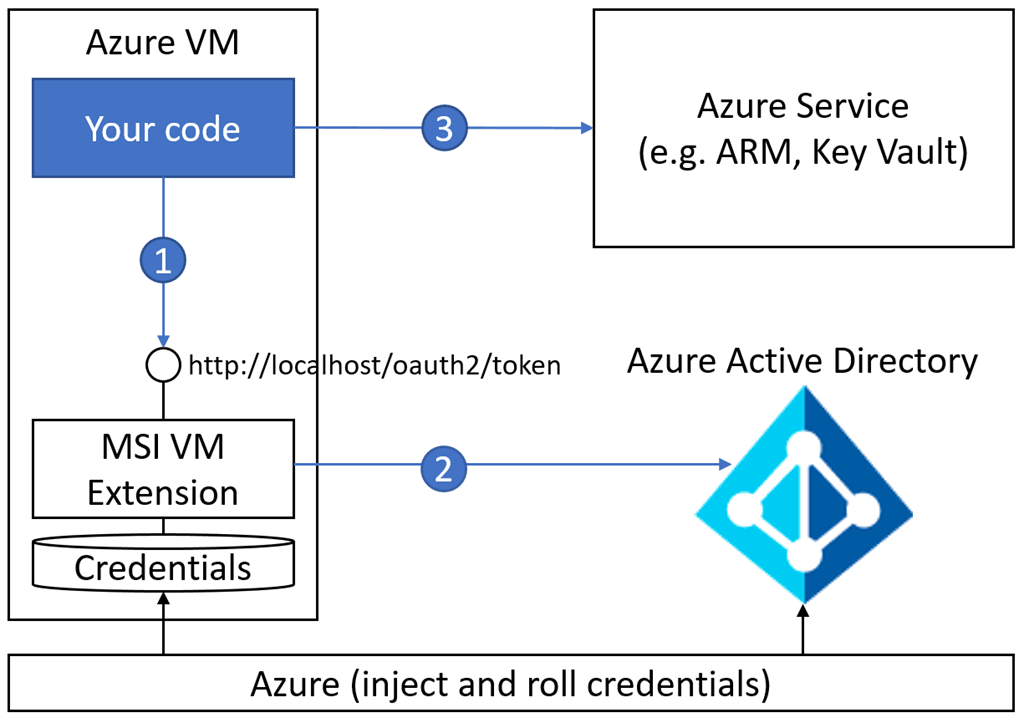
The NMI pods are in a DaemonSet to ensure there is one running on every node. NMI is the resource that is used when your pods look to use their identity. The applications running in the pod make a call to get their identity in the same way you would do so for an app running on a VM, web app or function, using the same libraries you are used to using. When this happens, a call is made to the Azure instance metadata URL. This URL normally does not exist inside a pod, but with a pod, identity deployed these requests are routed to the NMI instance on the node. NMI then talks to the MIC to get the identity mapping and then makes a request to Azure to retrieve the actual identity.
Deployment
Deploying the resource required for Pod Identity can be done with a single Kubernetes command. This command pulls the configuration from Github, so be sure to review this file to ensure you are comfortable with it. If you prefer you can download a copy and then run from this locally. Note that this deployment puts these in the default namespace, if you want them somewhere different you need to amend this. We’ll go ahead and deploy using this command:
kubectl create -f https://raw.githubusercontent.com/Azure/aad-pod-identity/master/deploy/infra/deployment.yaml
You should get a success response that creates the required custom resources, pods and daemonset.

You can check they are all running using
kubectl get pods

Identity Creation
Now we have the required resource running in our cluster we need to create the managed identity we want to use. There are two types of Managed Identity available in Azure:
- System Assigned - These identities are enabled directly on the Azure object you want to provide an identity. They are bound to the lifecycle of this resource and cannot be used by any other resource
- User Assigned identity - These identities are created as a standalone object and can be assigned to one or more Azure resource. Their lifecycle is not bound to these objects.
We will be using user assigned identities, as a system assigned identities do not work in this scenario. We need to be able to assign identities to pods, which are not native Azure resources.
Create User Assigned Identity
The first thing we need to do is create the identity. We can do this through the portal, CLI or Powershell.
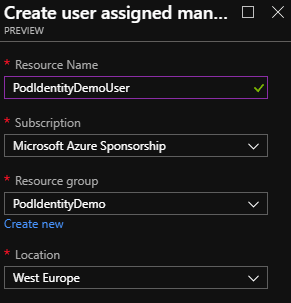
Portal
- Click the create resource button and search for “Managed Identity.”
- Click create
- Enter a name for the identity and select a subscription, resource group and region for this to be in
- Click create
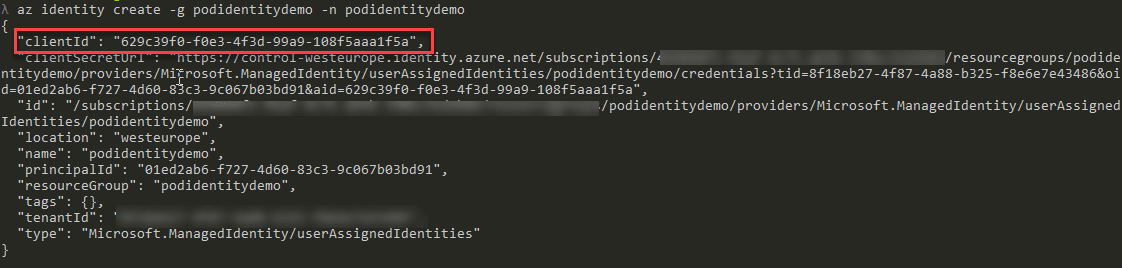
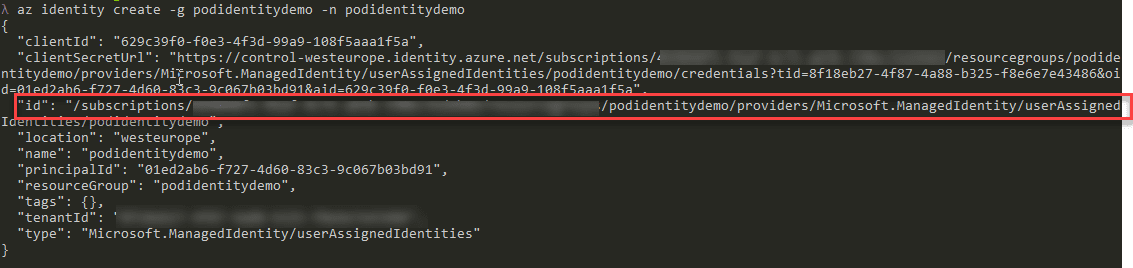
CLI
az identity create -g <RESOURCEGROUP> -n <USER ASSIGNED IDENTITY NAME
**PowerShell
New-AzureRmUserAssignedIdentity -ResourceGroupName <RESOURCEGROUP> -Name <USER ASSIGNED IDENTITY NAME>
Get Identity Details
Once you have created your identity we need to note down a couple of pieces of information:
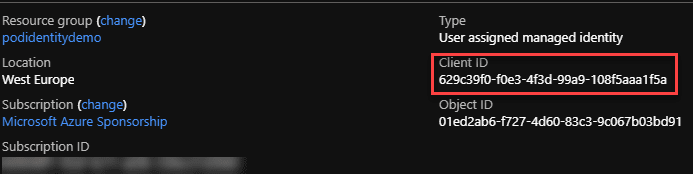
Client ID
In the portal, this can be found by clicking on the identity and looking at the overview. It is labelled as “Client ID”.
In the CLI or PowerShell, when you created the identity, it should have outputted some information on the identity, one of which is the Client ID.
Resource ID
We also need the full resource ID of the identity. In the portal, you can find this by clicking on the “Properties” option. The ID should be listed on the page that opens.
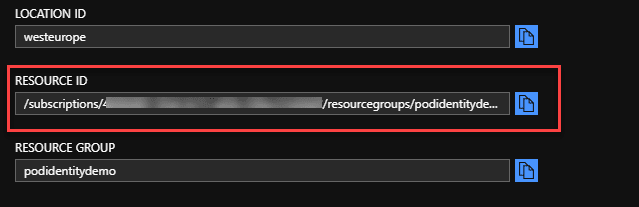
In PowerShell or CLI it is again listed in the output from the create command.
Grant Permissions to Resources
Now we have an identity created we need to go ahead and grant it permissions on whatever resources we want it to access. In this case, we are looking to grant the identity the ability to read secrets from Key Vault. Using the “Client ID” you noted down in the previous step you should:
- Grant this identity read access on the Key Vault object using RBAC permissions
- Grant this identity the ability to read the secrets in the vault using the vault permissions. This is done by selecting the vault in the portal and going to “Access Policies”. The only rights required for this demo are get and list on secrets.
Grant Cluster Permission to Identity
For the cluster to be able to read and assign this identity to a pod we also need to grant the service principal that your AKS (or ACS) cluster is running as permissions on this identity. To achieve this, you need to know the Client ID of this service principal. If you are using AKS the easiest way to achieve this is to run this command in the CLI:
az aks list -g <RESOURCEGROUP OF AKS CLUSTER>
This command should output information about the cluster, including the Client ID.

Now we have the client ID we can grant the “Managed Identity Operator” role to it on our Identity.
Portal
- Locate the Managed Identity you created in the portal and select it
- Go to “Access Control (IAM)
- Click “Role Assignments”
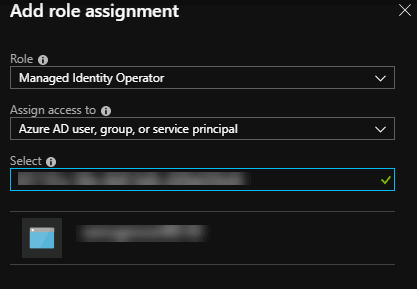
- Click “Add Role Assignment”
- In the “Role” drop-down select “Managed Identity Operator”
- In the search box enter the Client ID of the AKS cluster Service Principal
- Click Save
CLI
az role assignment create --role "Managed Identity Operator" --assignee <CLIENT ID OF AKS CLUSTER> --scope <FULL RESOURCE ID OF MANAGED IDENTITY>

**PowerShell**

```powershell
New-AzureRmRoleAssignment -ObjectId <CLIENT ID OF AKS CLUSTER> -RoleDefinitionName "Managed Identity Operator" -Scope <FULL RESOURCE ID OF MANAGED IDENTITY>
Create Identity and Binding
Now we have everything set up we need to create two custom objects in our Kubernetes cluster:
- Pod identity - this is the actual identity object that will be used by the pods
- Pod Identity Binging - This maps pods to the identity they should use
Pod Identity
To create the identity, we create a Kubernetes YAML file that defines the resource ID and client ID of the identity we wish to create. We give this identity a name, this can be anything, but it is what we will use to reference the identity in the binding.
apiVersion: "aadpodidentity.k8s.io/v1"
kind: AzureIdentity
metadata:
 name: podidentitydemouser
spec:
 type: 0
 ResourceID: <Resource ID of Managed Identity>
 ClientID: <Client ID of Managed Identity>
Save this file somewhere locally then deploy using this command:
kubectl create -f <path to file>
Pod Identity Binding
Now we have created an identity object in Kubernetes; we need to determine what pods we want to bind the identity to. We are not going to bind it to a specific pod here directly but instead, bind to a label. This way any time a pod is created with that label it will get the ID assigned automatically. The name of the label will always be “aadpodidbinding”, but the value is what we define in this binding. When the value of aadpodidbinding matches what we define here, the role will be assigned.
apiVersion: "aadpodidentity.k8s.io/v1"
kind: AzureIdentityBinding
metadata:
 name: podidentitydemouser-binding
spec:
 AzureIdentity: podidentitydemouser
 Selector: demo-kv-access
We use the name of the identity we created in the previous step, then define a label value of “demo-kv-access”. The label value can be anything you want, so long as you use the same value on your pods.
A Note on Security
Now that we have created Identity and Binding objects in the cluster it is possible for anyone who has access to these to be able to assign them to their pods and use them to access resources. Because of this, it is essential to make sure that these identities are scoped appropriately not to be a security risk:
- Access to use the Kubernetes identity objects should be locked down using Kubernetes RBAC to only users who are allowed to make use of them
- The Managed Identity object in Azure should only be granted rights to do what it needs to do and nothing more
Deploying Pods
We now have an identity created in Kubernetes and a binding ready to attach to any pods that have a specific label. All we need to do now is deploy a pod that is ready to use this identity to access key vault. This pod needs to be running an application or service that can make use of Managed Identity once the binding is attached.
In our example, we are using the Keyvault Flex volume service which will use this binding to talk to Key Vault and retrieve secrets. We’re going to make 2 changes to the YAML file to deploy our pod:
- Add a label called “aadpodidbinding” with a value of “demo-kv-access” to attach the binding
- Amend the Flex Volume parameters to change to using Managed Identity and remove the secret reference to the service principal.
Our YAML file now looks like this:
apiVersion: v1
kind: Pod
metadata:
  name: keyvault-demo
  labels:
      aadpodidbinding: "demo-kv-access"

spec:
  containers:
  - name: keyvault-demo
    image: nginx
    volumeMounts:
    - name: secret-1
      mountPath: /secret1
      readOnly: true
  volumes:
  - name: secret-1
    flexVolume:
      driver: "azure/kv"
      options:
        usepodidentity: "true"
        resourcegroup: <Name of Resource Group holding Key Vault>
        keyvaultname: <Name of Key Vault>
        keyvaultobjectname: <Name of Secret>
        keyvaultobjecttype: secret # OPTIONS: secret, key, cert
        keyvaultobjectversion: <Version ID of Key Vault Secreet>
        subscriptionid: <ID of subscription holding Key Vault>
        tenantid: <Azure AD Tenant ID>
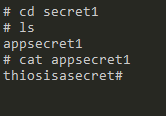
Once the Pod has started, we can exec onto it and confirm that we now have a mount point at /secret1

If we move into this folder, we should see a file with the name of the secret we mounted, in this case, “appsecret1” and if we output the value of that file, we see our secret value.
Summary
The Pod Identity project provides a relatively simple way to switch from using Service Principals inside your pods to using Managed Identity. Managed Identity removes many headaches around providing secure access to identities as well as dealing with things like key rotation and renewals.
By utilising User Assigned identities and Kubernetes tags, it offers a flexible way to set up your identities in advance and assign them to pods as required.
Image Attribution
Fingerprinted flickr photo by Jeremy Brooks shared under a Creative Commons (BY-NC) license
