Managed disks brought a number of benefits to Azure VM’s over thee previous method of manually managing storage accounts used for VM disks. One of these features that is often overlooked or misunderstood is snapshots. In this article we’ll explore what benefits snapshots give you, and how to use them.
Before we delve into how to use snapshots, there are some key points to be aware of when using them:
When your learning a new technology, like Azure, documentation is key and find inaccurate, out of date or just plain wrong documentation is incredibly frustrating. Microsoft have taken an interesting approach to this issue by storing all Azure (and many other MS services) documentation sources on Github and allowing the community to submit pull requests. What this means is that if you spot an error in a document or you feel it needs updating you can make this change your self and get the document updated very quickly, rather than waiting for product teams to spot the issue and make corrections.
Don’t forget to check out the other parts in this series:
Part 1 – Version Control Part 2 – Testing Part 3- Build Initially this might seem like a bit of an odd topic, “Build” in a software development process usually refers to the process of compiling an application and preparing it for distribution (creating MSI files etc.). Whilst we are writing infrastructure as code, there’s no compilation involved, no creating of installers, so what are we doing here?
Historically Azure Network Security Groups (NSG’s) have only allowed you to enter a single value for things things like source or destination IP and source or destination port. This has meant that for complex setups you end up with a very large amount of NSG’s. This is especially if you are trying to filter a large amount of IP’s, for example the Azure Data Center IP ranges, which is a common requirement if you want to restrict outbound access but allow access to PaaS resources.
Back a few years ago it was not uncommon to see a requirement for VMs to be rebooted when maintenance to apply updates to the underlying host was required, every few months. Fortunately this is now mostly a thing of the past, with most updates now being applied using Azure’s in place upgrade process which just pauses for a few seconds while the VM whilst the host is updated. Up until recently I had not seen a maintenance window that require VM reboots for over a year.
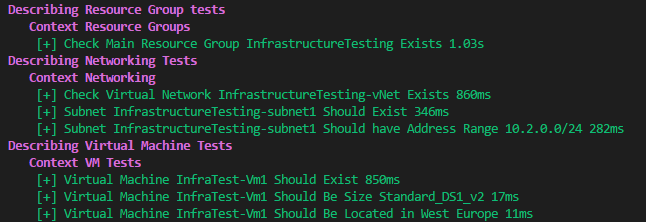
Pester is a versatile testing framework built using PowerShell. In this article we are going to look at using Pester to audit our Azure infrastructure for security compliance.
We’ve previously discussed using Pester to test Azure resources in our infrastructure pipeline. In that article we used Pester to run against a deployed Azure environment to check what we thought we had deployed had actually been deployed. In this article we’re going to take this a bit further and look at using Pester to validate that we have setup our environment in a secure manner and look for areas of concern, essentially a security audit.
Don’t forget to check out the other parts in this series:
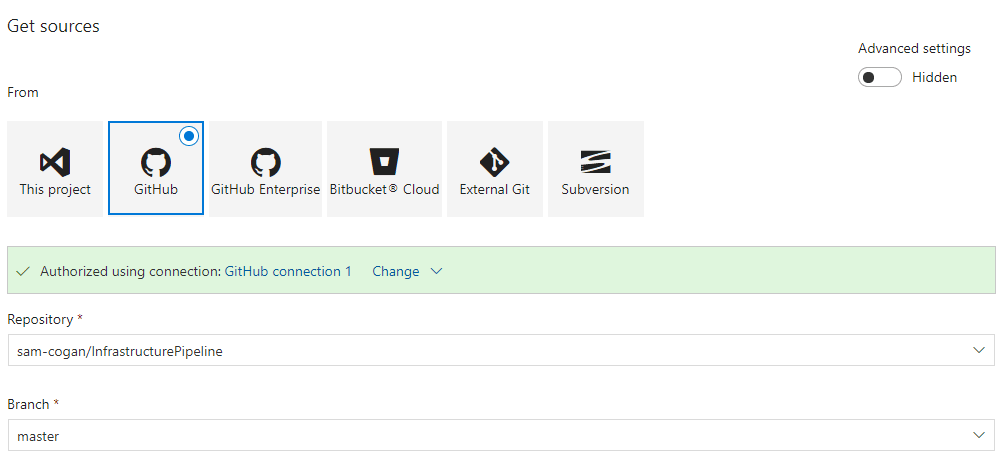
Part 1 – Version Control Part 2 – Testing Part 3- Build In part 1 of this series we took our first step in building an Infrastructure as code pipeline by moving our infrastructure files into source control. Now that we have this code in a central repository we can use this as a base for the next steps in this process.
Role Based Access Control is Azure’s method for setting permissions on resources to control who can manage and administer these resources. Each type of Azure resource has a number of permissions that can be set on it, and these permissions can be grouped into roles that can be applied to users or groups of users to grant rights to manage resources. Out of the box Azure comes with a large number of pre-defined roles for common workloads.
Don’t forget to check out the other parts in this series:
Part 1 – Version Control Part 2 – Testing Part 3- Build Defining Infrastructure as Code is becoming prevalent in all areas of IT, but none more so than in the cloud. Be this Azure Resource Manager Templates, AWS Cloudformation or third party tools like Terraform. Once you’ve gone down this route, you open up the ability to treat your infrastructure code like any other code, and because it’s just code you can now leverage some of the tools developers have been using for years in their software lifecycle.
Microsoft recently announced the introduction of Azure Free Accounts, these are credit and resources that are free for a certain time period. This is aimed at competing with AWS free tier and similar offerings. Before we take a look at what is on offer, there are a few caveats to check to see if you are actually eligible:
To claim the free offer you need to be a new Azure customer, so that means your account has never had a previous trial or been a paying Azure customer.