Upgrade Time! - New Home Lab
I’ve been running a home Kubernetes lab for a while now, mainly to help with studying the CKA/CKS exams which I took a couple of years ago (and that I need to make sure to renew this year!). This lab has been running on a collection of Raspberry Pi 4 boards, which has worked fine however it does have some limitations. In particular, I can only run ARM 64 images, which does limit some of what I can run. I wanted to start doing some work with Azure Arc and managing my cluster through Azure, but this doesn’t support using ARM images, so it was time to upgrade my lab with some AMD 64 nodes.
I also wanted to work on automating the setup of my cluster. You know I’m a sucker for infrastructure and configuration as code, so I wanted the challenge of automating this process wherever possible.
Hardware
To get started, I needed some new hardware. Whilst I wanted a fairly powerful cluster, it needed to be small, quiet and economical. To facilitate this I followed the lead of Thomas Maurer and purchased an Intel NUC device to run the cluster. The hardware looked like this:
- Intel Core i5 Wallstreet Canyon NUC 12
- 64 GB DDR4 RAM
- 1TB Samsung Evo Plus M2
This provides a pretty good spec for a dev cluster with 16 CPU cores, 64GB RAM and 1TB of fast local storage. I’ll supplement the storage with up to 12TB of NFS storage from my local file server that services other network services.
Hypervisor
Once I’d got the hardware setup I needed an operating system to run things. I wanted to be able to set up a multi-node Kubernetes cluster so we needed to install a hypervisor to create some VMs on the node that can act as our Kubernetes cluster, and gives us the flexibility to run other workloads on the cluster as well.
There are several options for Hypervisors, I wanted to stick with a Linux hypervisor so Hyper-V was out, and so the main options were either VMWare ESXi or Proxmox. Proxmox is an open-source Hypervisor that is popular with home lab users due to its low cost (free) and extensive hardware support. Given that I don’t need to work with ESXi in my day job, and I didn’t want to shell out for licences, I elected to use Proxmox. I was also interested in working with it, having never used it before.
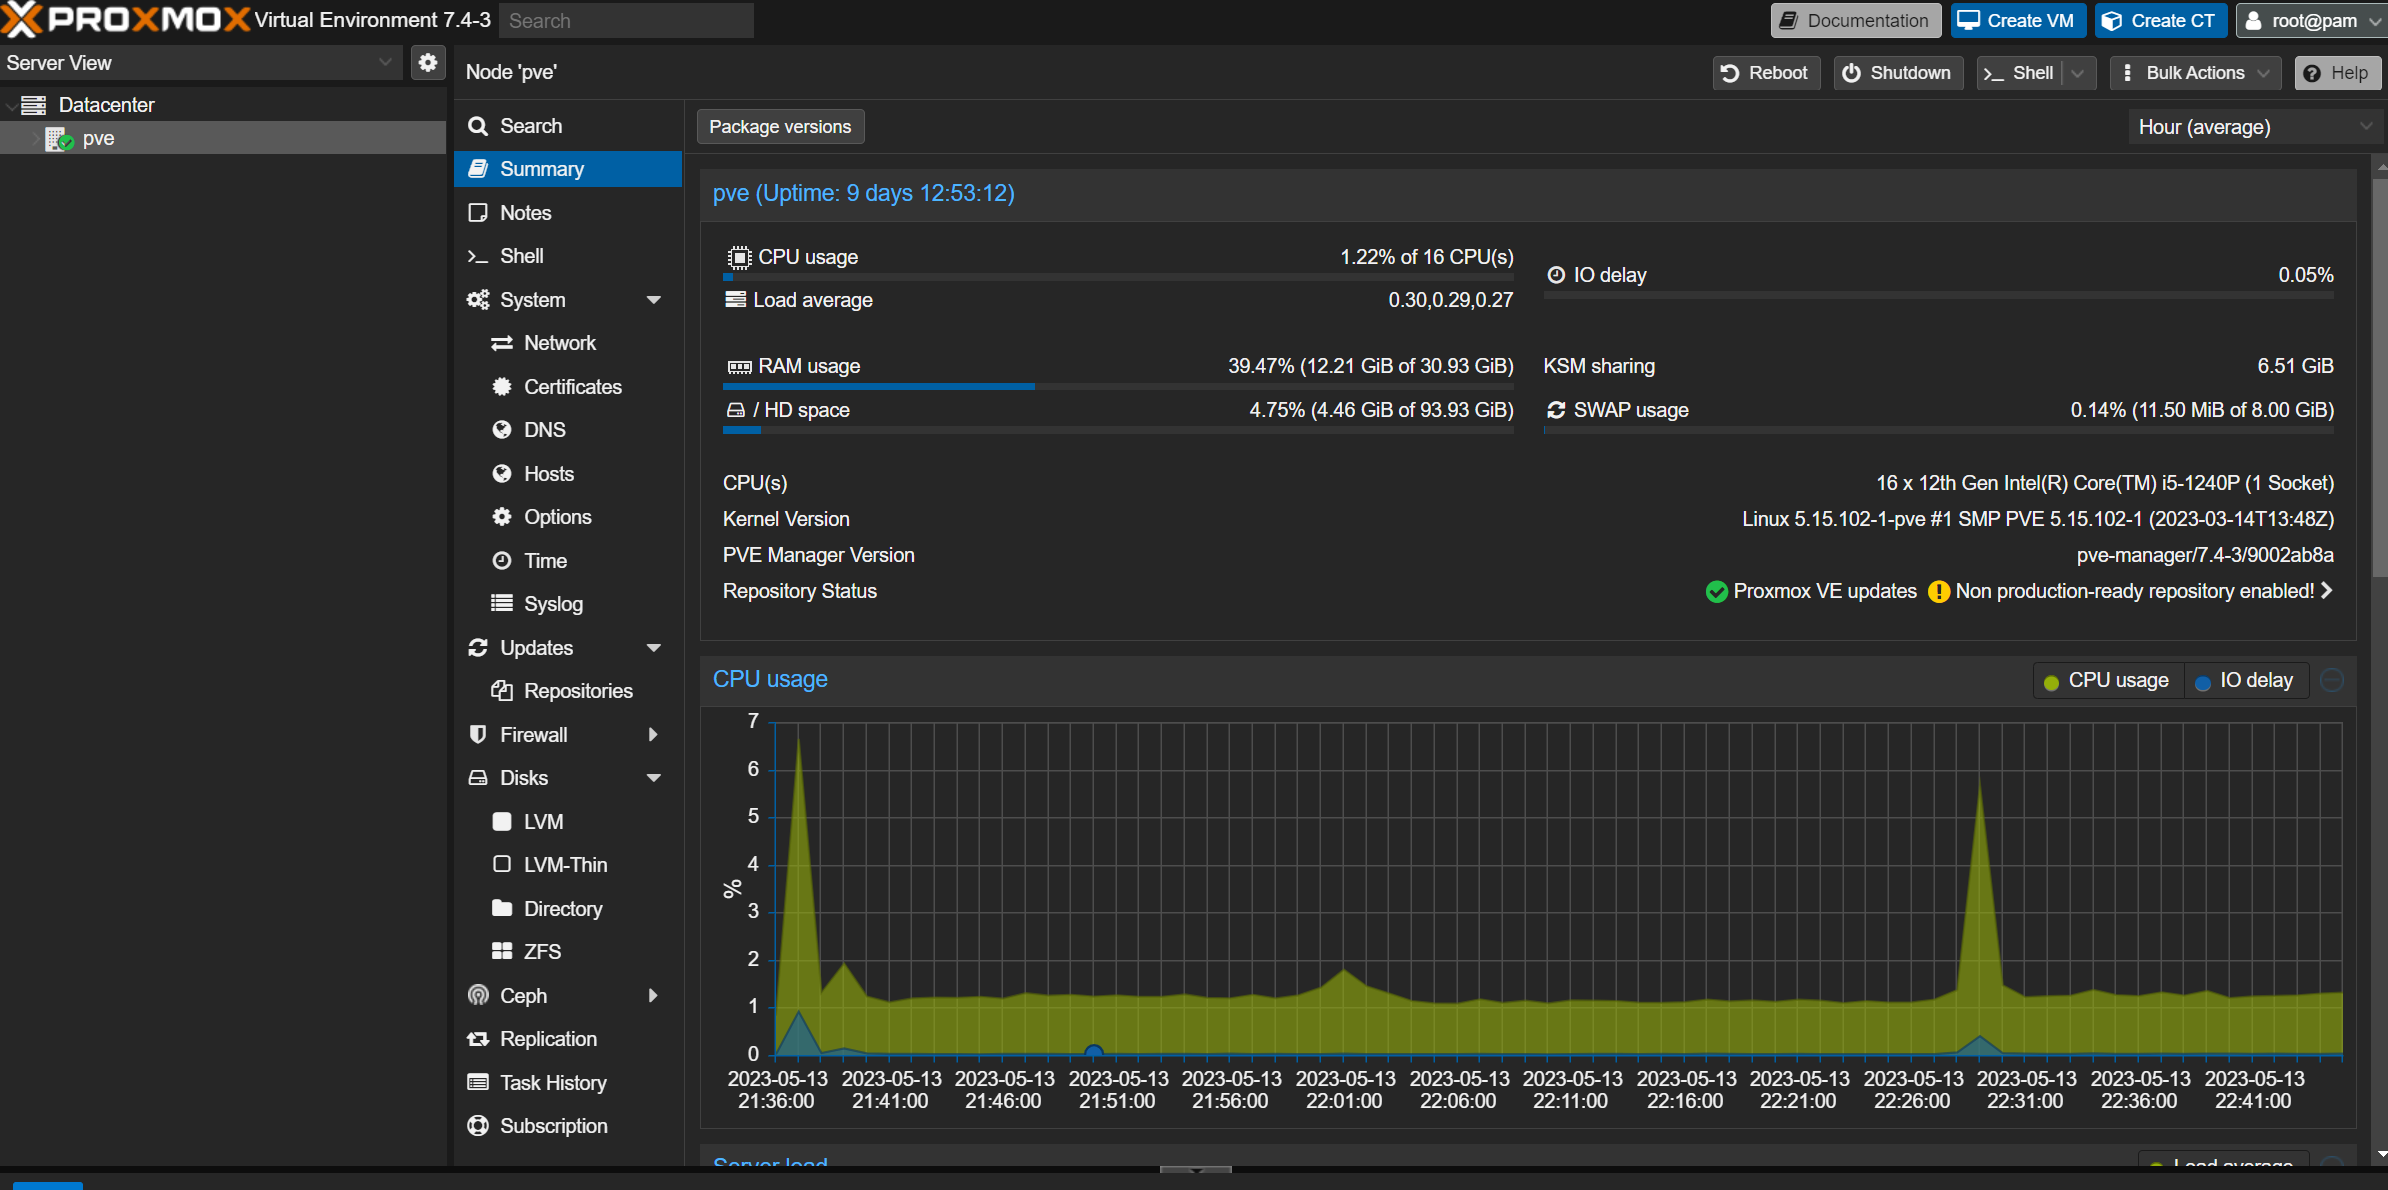
Installing this onto the bare metal wasn’t something I could easily achieve with automation. I possibly could have done something with PXE boot, that was a lot of work for something I was only going to do once. Instead, I elected to create a USB boot drive and run the installation manually. Once the installer had run through I had a work hypervisor, which had found all my hardware and a working web UI to manage it.
VM Images
Next, we need a base operating system image to run our VMs with. I downloaded the latest Ubuntu Server ISO file. If we were creating the VM’s manually with an interactive UI we could use the ISO directly to create the VM, but because we want to automate this we don’t want to manually have to respond to setup prompts. There are a few ways to do this, the way I handled it was to create a template in Proxmox, this is a reusable VM image that you create by setting up a VM the way you want it, and then creating the template.
We could create this template manually, but where’s the fun in that? Instead, I used [Packer](Packer by HashiCorp), the tool from Hashicorp to create VM images to automate this process. I’ve talked about using Packer before in my article on [building scale set images with Packer](Building Azure Scale Set Images with Packer and DSC - samcogan.com). This was a fairly simple packer script, it created a VM from the ISO, then ran some updates using apt. We could have installed additional software here if we wanted to, however, I was looking to do this later with Ansible.
The packer script I used can be seen below:
# Ubuntu Server Jellyfishr
# ---
# Packer Template to create an Ubuntu Server (Jellyfish) on Proxmox

# Variable Definitions
variable "proxmox_api_url" {
    type = string
}

variable "proxmox_api_token_id" {
    type = string
}

variable "proxmox_api_token_secret" {
    type = string
    sensitive = true
}

# Resource Definiation for the VM Template
source "proxmox" "ubuntu-server-jellyfish" {

    # Proxmox Connection Settings
    proxmox_url = "${var.proxmox_api_url}"
    username = "${var.proxmox_api_token_id}"
    token = "${var.proxmox_api_token_secret}"
    # (Optional) Skip TLS Verification
    insecure_skip_tls_verify = true

    # VM General Settings
    node = "pve"
    vm_id = "8004"
    vm_name = "ubuntu-server-jellyfish"
    template_description = "Ubuntu Server Jellyfish Image"

    iso_file = "local:iso/ubuntu-22.04.2-live-server-amd64.iso"
    iso_storage_pool = "local"
    unmount_iso = true

    # VM System Settings
    qemu_agent = true

    # VM Hard Disk Settings
    scsi_controller = "virtio-scsi-pci"

    disks {
        disk_size = "20G"
        format = "raw"
        storage_pool = "local-lvm"
        storage_pool_type = "lvm"
        type = "virtio"
    }

    # VM CPU Settings
    cores = "1"

    # VM Memory Settings
    memory = "2048"

    # VM Network Settings
    network_adapters {
        bridge = "vmbr0"
    }

    # VM Cloud-Init Settings
    cloud_init = false

    # Windows 10 Ethernet interface
    # http_interface = "Wi-Fi"

    # PACKER Boot Commands
     boot_command = [
      "c",
      "linux /casper/vmlinuz --- autoinstall ds='nocloud-net;s=http://192.168.1.166:8336/' ",
      "<enter><wait>",
      "initrd /casper/initrd<enter><wait>",
      "boot<enter>"
  ]
    boot = "c"
    boot_wait = "10s"

    # PACKER Autoinstall Settings
    http_directory = "http"
    # (Optional) Bind IP Address and Port
    # http_bind_address = "0.0.0.0"
    http_port_min = 8336
    http_port_max = 8336

    ssh_username = "deploy"

    # (Option 1) Add your Password here
    ssh_password = "Add Password here"
    # - or -
    # (Option 2) Add your Private SSH KEY file here
    # ssh_private_key_file = "~/.ssh/id_rsa"

    # Raise the timeout, when installation takes longer
    ssh_timeout = "20m"
}

# Build Definition to create the VM Template
build {

    name = "ubuntu-server-jellyfish"
    sources = ["source.proxmox.ubuntu-server-jellyfish"]

    # Provisioning the VM Template for Cloud-Init Integration in Proxmox #1
    provisioner "shell" {
        inline = [
            "while [ ! -f /var/lib/cloud/instance/boot-finished ]; do echo 'Waiting for cloud-init...'; sleep 1; done",
            "sudo rm /etc/ssh/ssh_host_*",
            "sudo truncate -s 0 /etc/machine-id",
            "sudo apt -y autoremove --purge",
            "sudo apt -y clean",
            "sudo apt -y autoclean",
            "sudo cloud-init clean",
            "sudo rm -f /etc/cloud/cloud.cfg.d/subiquity-disable-cloudinit-networking.cfg",
            "sudo sync"
        ]
    }

}
I also used some cloud-init files to pass values to the installation when it ran to avoid the need to respond to the UI. This used Packer’s ability to host a small webserver for hosting cloud-init files. Because I was using WSL to run Packer I did need to make a couple of changes to make this work. First, I had to set the port for the webserver to a fixed port, you can see that in the file above where it is set to 8036. Second I had to enable port forwarding to pass requests from Windows to WSL on this port.
netsh interface portproxy add v4tov4 listenport=<port-to-listen> listenaddress=0.0.0.0 connectport=<port-to-forward> connectaddress=<forward-to-this-IP-address>
I then created an http folder and added the user-date file.
#cloud-config
autoinstall:
  version: 1
  locale: en_US
  keyboard:
    layout: us
  ssh:
    install-server: true
    allow-pw: true
    disable_root: true
    ssh_quiet_keygen: true
    allow_public_ssh_keys: true
  packages:
    - qemu-guest-agent
    - sudo
  storage:
    layout:
      name: direct
    swap:
      size: 0
  user-data:
    package_upgrade: false
    timezone: Europe/London
    users:
      - name: deploy # add your username here
        groups: [adm, sudo]
        lock-passwd: false
        sudo: ALL=(ALL) NOPASSWD:ALL
        shell: /bin/bash
        passwd: <base64 encoded password>
        ssh_authorized_keys:
          - public key
I also created an empty meta-data file, this is not used by my script but is needed for Packer to work.
Creating VMs
Now that we have a template, we’re ready to create the VMs. Again, we want to automate this as well, and in this case, we are going to use Pulumi to define our infrastructure. This uses the [Proxmox community provider]](https://www.pulumi.com/registry/packages/proxmoxve/) which allows us to create various Proxmox resources, including VMs. We needed to create multiple VMs, so to make this easier we created a Pulumi component resource (essentially a reusable module) which can be used to create VMs:
import * as pulumi from "@pulumi/pulumi";
import * as proxmox from "@muhlba91/pulumi-proxmoxve";

export interface machineSpec {
    count: number;
    cpuCores: number;
    cpuSockets: number;
    memoryInMb: number;
    diskSizeInGb: number;
}

export interface promoxVmArgs{
    machineSpec: machineSpec,
    machineIndex: number,
    ipAddress: string


}

export class promoxVm extends pulumi.ComponentResource {
    constructor(name: string, args: promoxVmArgs, opts: pulumi.ComponentResourceOptions = {}) {
        super("pkg:index:promox-vm", name, {}, opts);

        const vm = new proxmox.vm.VirtualMachine(name, {

            nodeName: "pve",
            agent: {
                enabled: true,
                trim: true,
                type: 'virtio'
            },
            bios: 'seabios',
            cpu: {
                cores: args.machineSpec.cpuCores,
                sockets: args.machineSpec.cpuSockets
            },
            clone: {
                vmId: 8004,
                full: true,
                nodeName: 'pve',

            },
            disks: [
                {
                    interface: 'virtio0',
                    datastoreId: 'local-lvm',
                    size: args.machineSpec.diskSizeInGb,
                    fileFormat: 'raw'
                },
            ],
            memory: {
                dedicated: args.machineSpec.memoryInMb,
            },

            name: name,
            networkDevices: [
                {
                    bridge: 'vmbr0',
                    model: 'virtio',
                    enabled: true,

                },
            ],
            onBoot: true,
            operatingSystem: {
                type: 'l26',
            },
            started: true,
            vmId: args.machineIndex,
            initialization: {

                type: 'nocloud',
                datastoreId: 'local-lvm',
                dns: {
                    domain: 'samcogan.com',
                    server: '1.1.1.1 1.0.0.1',
                },
                ipConfigs: [
                    {
                        ipv4: {
                            address: args.ipAddress,
                            gateway: '192.168.1.1',
                        }
                    },
                ],
                userAccount: {
                    username: 'proxmox',
                    password: 'add password here',
                    keys: ['add public key here'],
                },
            }


        }, {
            provider: opts.provider,
            parent: this
        })
    }
}
We then used this component module to create one master node and 3 worker nodes.
import * as pulumi from "@pulumi/pulumi";
import * as proxmox from "@muhlba91/pulumi-proxmoxve";
import * as proxmoxVm from "./components/promox-vm";
import internal = require("stream");

let config = new pulumi.Config();
let masterSpec = config.requireObject<proxmoxVm.machineSpec>("masterSpec");
let workerSpec = config.requireObject<proxmoxVm.machineSpec>("workerSpec");

const provider = new proxmox.Provider('proxmoxve', {
    endpoint: 'https://192.168.1.25:8006',
    insecure: true,
    username: 'Proxmox User',
    password: 'Proxmox Password'
});


for (let i = 0; i < masterSpec.count; ++i) {
    const vm = new proxmoxVm.promoxVm("master0"+(i+1), {
        machineSpec: masterSpec,
        ipAddress: "192.168.1.2"+i+"/24",
        machineIndex: 1000+i
    }, {provider: provider})
}

for (let i = 0; i < workerSpec.count; ++i) {
    const vm = new proxmoxVm.promoxVm("worker0"+(i+1), {
        machineSpec: workerSpec,
        ipAddress: "192.168.1.3"+i+"/24",
        machineIndex: 2000 + i
    }, {provider: provider})
}
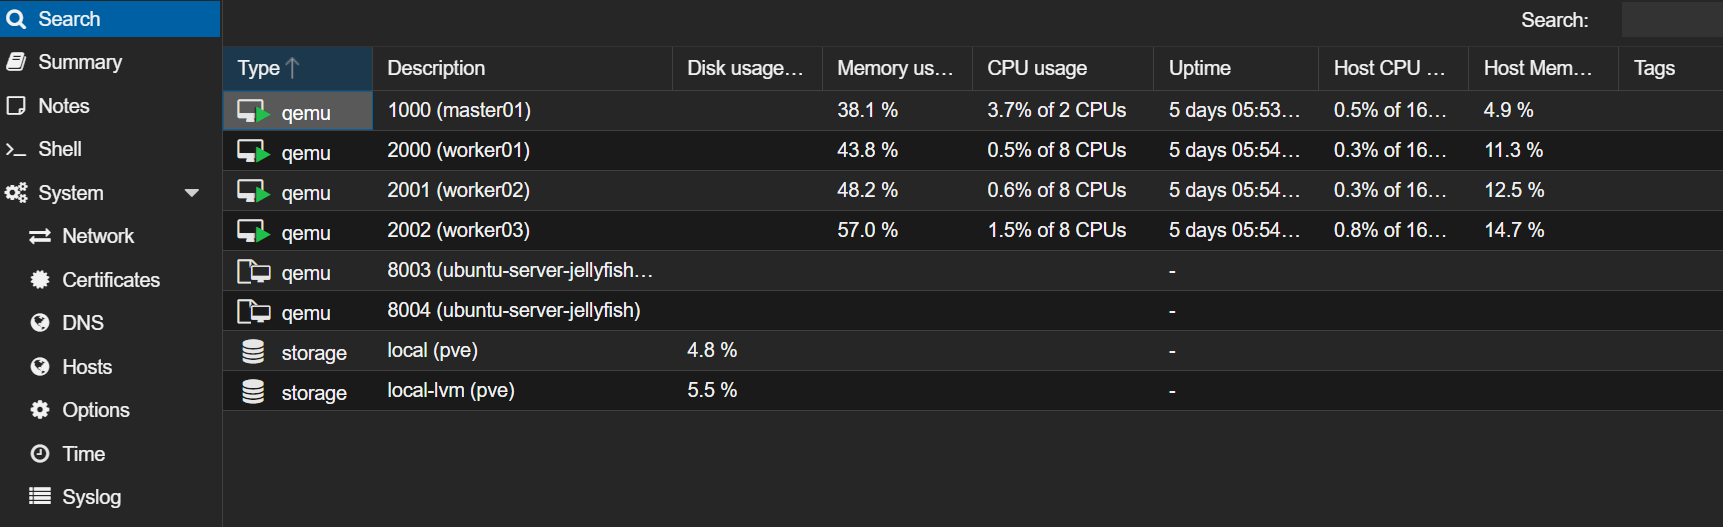
Once we ran this Pulumi code we had 4 VMs with our Ubuntu image up and running.
Installing Kubernetes
We now have our VMs up and running but with nothing on them except the OS. I chose to use K3S, the minimal Kubernetes distribution from Rancher to keep the amount of resources used by Kubernetes down. I wanted to automate the install of this using Ansible, the configuration as code tool, and it turns out there is an [official K3S Ansible implementation](k3s-io/k3s-ansible (github.com)).
This was easy to implement, just check out the repo and then copy the sample inventory folder to a new folder, and update the inventory file. We added our single master and 3 worker nodes. We also added the user for connecting to these nodes (Ansible connects using SSH, in my case it used an SSH key defined on my deployment host).
[master]
192.168.1.20 ansible_user=proxmox

[node]
192.168.1.30 ansible_user=proxmox
192.168.1.31 ansible_user=proxmox
192.168.1.32 ansible_user=proxmox

[k3s_cluster:children]
master
node
We then just ran the ansible command, pointing at this inventory file.
ansible-playbook site.yml -i inventory/my-cluster/hosts.ini
This ran through, and at the end of it we had a working Kubernetes cluster, it was as simple as that. I did notice that it was running an older version of K3s, but this was a simple fix. Open the group_vars file in the same folder as your inventory and update the k3s_version value.
---
k3s_version: v1.27.1+k3s1
ansible_user: proxmox
systemd_dir: /etc/systemd/system
master_ip: "{{ hostvars[groups['master'][0]]['ansible_host'] | default(groups['master'][0]) }}"
extra_server_args: ""
extra_agent_args: ""
We ran the ansible command again and it updated to the latest version.
Installing Azure Arc Agent
The last piece of work is to install the Azure Arc agent onto the cluster so that it registers with Azure and can be managed in the Azure portal. The Arc agent runs as a set of containers in the cluster which then communicate with Azure using an outbound connection. The installation uses a Helm chart to create it, but so far I’ve not found a way to be able to run this using something like Pulumi. The only way I can find to set this up is using the Azure CLI (or PowerShell). There are a few steps that I needed to run this.
First I needed to add the ConnectedK8s extension.
az extension add --name connectedk8s
Then ensure the required resource providers are registered
az provider register --namespace Microsoft.Kubernetes
az provider register --namespace Microsoft.KubernetesConfiguration
az provider register --namespace Microsoft.ExtendedLocation
We’re now ready to register the cluster. The registration command uses the selected Kubectl context to connect to the cluster, so make sure the right cluster is selected. I also found I had to add the –kube-config property to point the command to where the Kubeconfig file was. Without this I would get this error: Problem loading the kubeconfig file. Invalid kube-config file. No configuration found.
az connectedk8s connect --name home-lab --resource-group kubernetes-arc --kube-config ~/.kube/config
This can take a while to run, but eventually, you should get a response indicating that the provisioning succeeded.
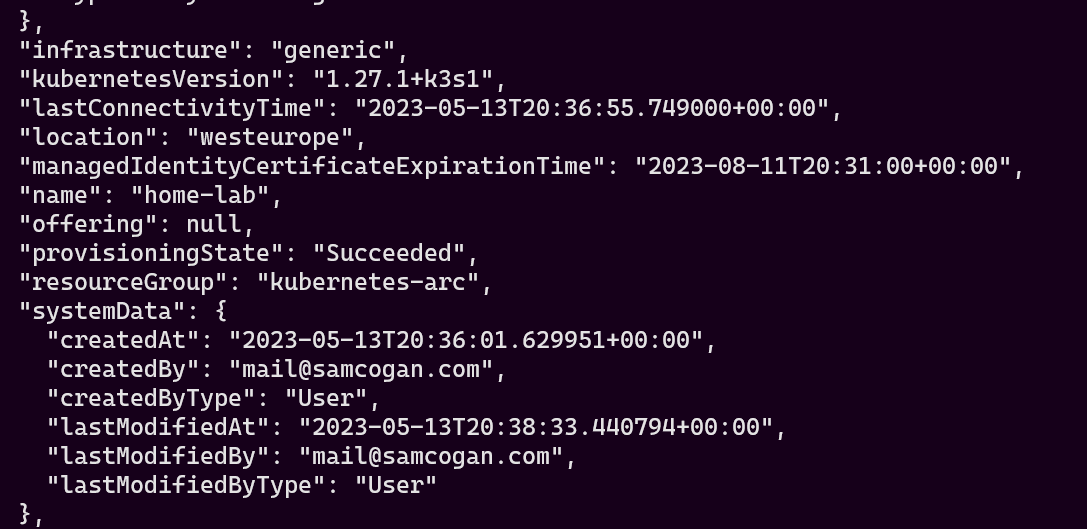
And if we check the Azure portal we can see our cluster is now fully registered.

Now I have a working cluster connected to Azure using Azure Arc. Expect some future blog articles about using Arc to manage local Kubernetes clusters and other Arc functionality.
