Free Azure Build Pipelines for Open Source Projects
Microsoft announced some changes to their Visual Studio Team Services production today, primary of which was a name change. VSTS now becomes Azure DevOps, which is made up of Azure Repositories, Azure Pipelines, Azure Boards, Azure Test Plans and Azure Artifacts. This update also included a new UI design and URLs. The full announcement can be found here
The most exciting part of this for me, however, was the announcement of unlimited, free, Azure Pipelines for building open source projects hosted on Github. By enabling Azure Pipelines for your Github projects, you can run builds for as many minutes as you want, for free. The only limitation is that you can only have 10 concurrent builds running at the same time. This is a great new feature for open source projects.
I host many Open Source projects on Github, so I thought I would take a look at enabling Azure Pipelines on one of these. The project I chose was the VS Code Azure Snippets project - https://github.com/sam-cogan/arm-snippets-vscode/.
Enable Azure Pipelines
The first thing we need to do is enable Azure Pipelines for our Github account. There is an app already available in the Github Marketplace, so we can go and search for that and select it.
Scroll down to the bottom of the page, and you can see the option to “install for free.”

Once you click on that, you’ll then be shown the price for your order, free!

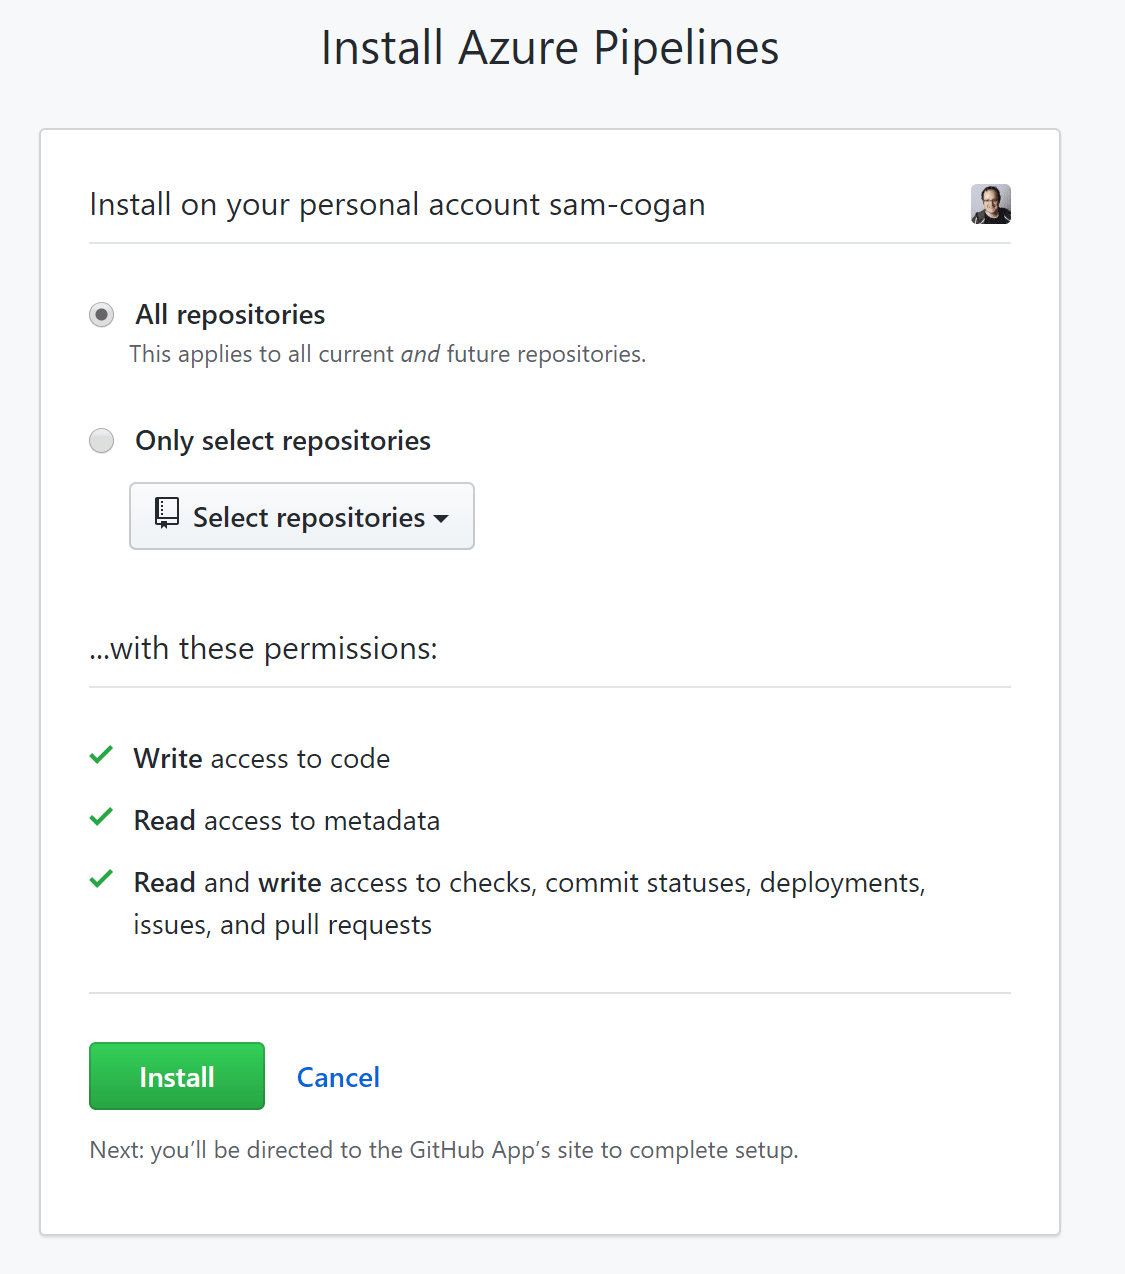
Click on “Complete Order”, and you’ll then be asked to grant permissions to your Repos for Azure Pipelines. You can grant it access to all your repositories or a specific repository.
You’ve now authorised the app on your account; now you need to link it to an Azure Pipelines workspace. You’ll be presented with a window asking you to select a project or create a new one. If you already have a VSTS or Azure DevOps workspace setup you can choose to use your existing ones (you’ll still get the free builds for your open source projects), if not you can use this wizard to create one.
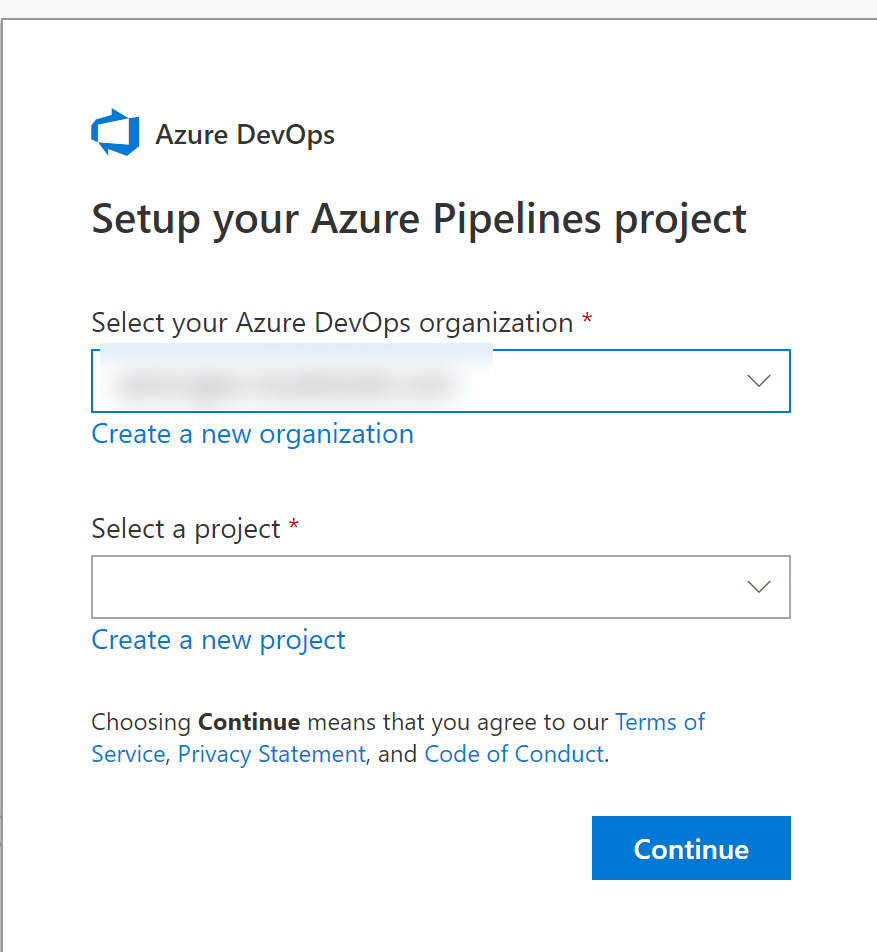
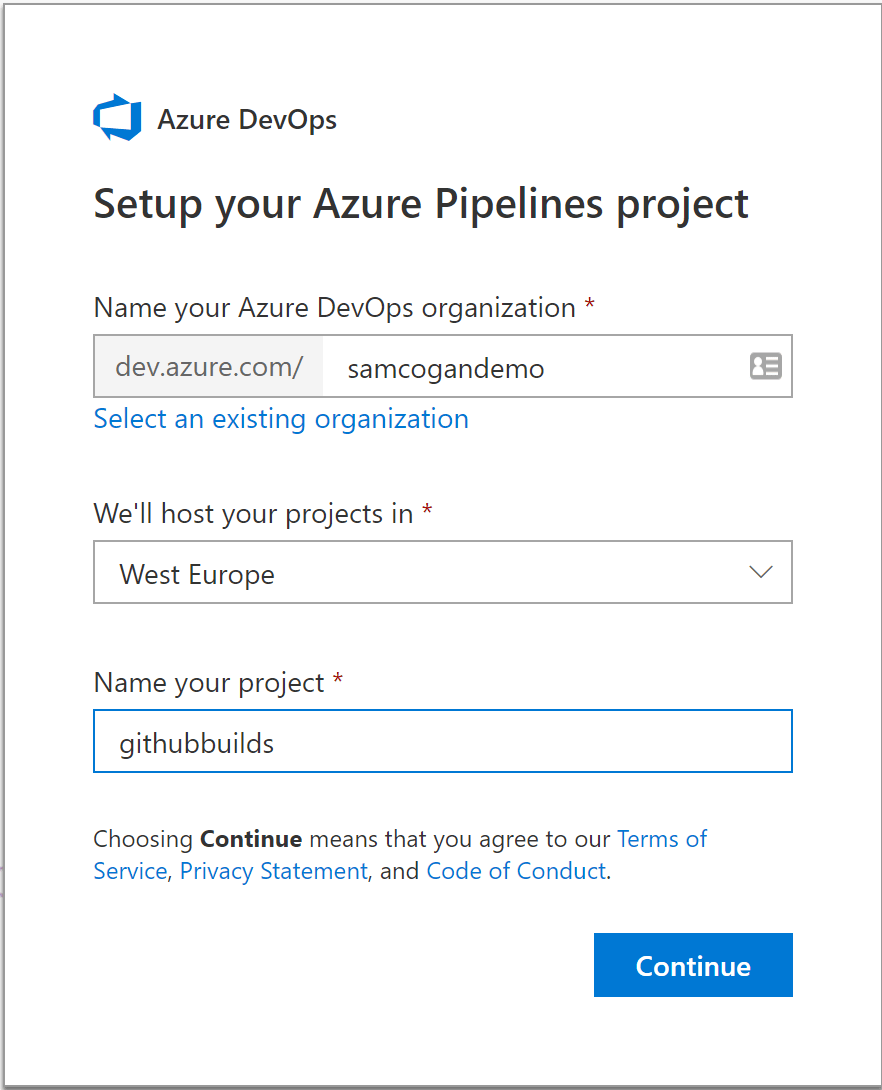
For this demo, we will go ahead and create a brand new organisation and project.
It will take a minute to create you a project; then it will take you to New Pipeline wizard to create your first pipeline. The first thing you need to do is select the repository you want to use.

Once selected, the wizard will parse your project and then suggest a template based on the language in use. In my project, it offered Node, as some of the VS Code plugin processes uses Node.

You can accept the template it offers, or one of the other suggest templates, search all templates, or start with a simple template. Given that I already had a build process defined for my project, I elected to use the simple template.

You will then be presented with your template in YAML format, with the option to Save and Run this.

Once you hit Save, it will kick off an initial build with your default template, and you can confirm that it all works, at least with the default options.

Creating your Pipeline
Now that you’ve set everything up you need to go ahead and edit your pipeline so that it does what you want. This is where I feel Microsoft have let things down a little. In the full version of VSTS/Azure DevOps, you get a graphical workflow editor to create your build as well as the option to edit the YAML file behind this manually. In the free pipelines it seems (as far as I can tell) they have limited you to just using the YAML file option, I could not find any way to enable the visual designer.
So, to define your build, you are going to need to edit the azure-pipelines.yaml file that was created in your repository to add the steps you need in your process. The syntax to use for all types of steps is documented here. In my project I need to do the following:
- Get my code from Github
- Run NPM Install
- Move some files to the appropriate locations
- Run a PowerShell Script
- Run VSCE to create the extension
- Publish an artifact of the extension package
My azure-pipelines file looks like this:
resources:
- repo: self
  clean: true
queue:
  name: Hosted
  demands:
  - npm
  - DotNetFramework

name: 1.3$(Rev:.r)

steps:
- task: Npm@0
  displayName: 'npm install'
  inputs:
    arguments: '-g vsce'


- task: CopyFiles@2
  displayName: 'Copy Files to: $(build.artifactstagingdirectory)\extension\'
  inputs:
    SourceFolder: Extension
    TargetFolder: '$(build.artifactstagingdirectory)\extension\'


- task: CopyFiles@2
  displayName: 'Copy Files to: $(build.artifactstagingdirectory)\extension\snippets'
  inputs:
    SourceFolder: 'azure-xplat-arm-tooling\VSCode'
    Contents: armsnippets.json
    TargetFolder: '$(build.artifactstagingdirectory)\extension\snippets'
    OverWrite: true


- task: PowerShell@1
  displayName: 'PowerShell Script'
  inputs:
    scriptName: tools/UpdateSnippetFile.ps1
    arguments: '-pathToFile $(build.artifactstagingdirectory)\extension\snippets\armsnippets.json -pathToPackageFile $(build.artifactstagingdirectory)\extension\package.json -buildNumber $(Build.BuildNumber)'


- task: CmdLine@1
  displayName: 'Run vsce '
  inputs:
    filename: 'vsce '
    arguments: package
    workingFolder: '$(build.artifactstagingdirectory)\extension\'


- task: PublishBuildArtifacts@1
  displayName: 'Publish Artifact: arm-snippets-$(Build.BuildNumber).vsix'
  inputs:
    PathtoPublish: '$(build.artifactstagingdirectory)\extension\arm-snippets-$(Build.BuildNumber).vsix'
    ArtifactName: 'arm-snippets-$(Build.BuildNumber).vsix'
The build definition is split into two sections, setup and tasks. In my setup section I do the following:
- Indicate that the task should pull from this git repo
- Run a clean before pulling
- Use a hosted build agent
- Demand the build agent support .net and npm
- Define a name, which is the build number for the pipeline
resources:
- repo: self
  clean: true
queue:
  name: Hosted
  demands:
  - npm
  - DotNetFramework

name: 1.3$(Rev:.r)
Then I define my tasks inside the “steps” section to undertake each of my defined tasks.
steps:
- task: Npm@0
  displayName: 'npm install'
  inputs:
    arguments: '-g vsce'
Building
Now we have defined a build, we need to run it. Builds in your pipeline will be triggered in 3 ways
- Manually by clicking on the build button
- Automatically when you commit changes directly the master branch (which you shouldn’t be doing) or when you merge a pull request into the master branch
- Automatically when you submit a pull request
You can also configure more triggers for builds (such as commits on other branches) in your build settings.

Once a build has been triggered, it shows up in the build pane, and you can view its status, If you click on a specific build you can then view the individual tasks and any logs or errors associated with them.
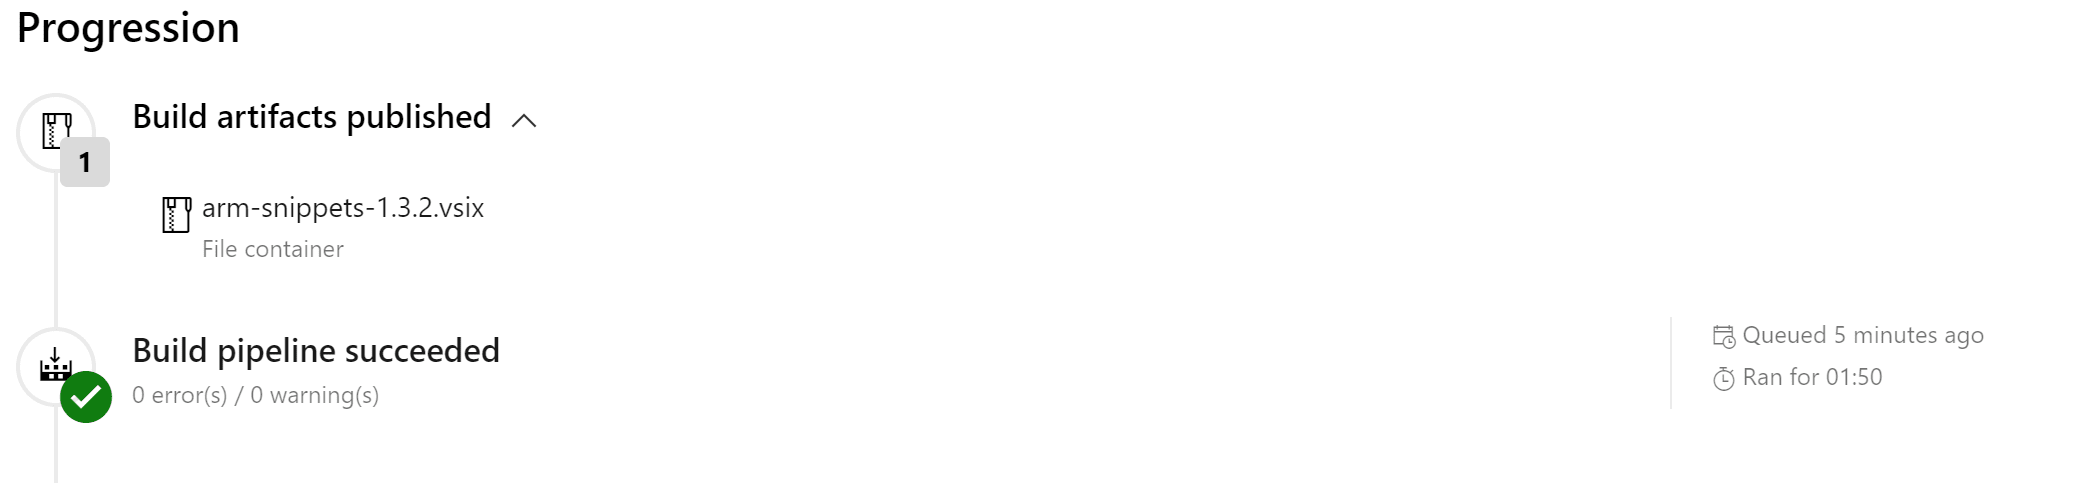
Hopefully, your build runs through the first time. Once it completes, any artifacts are available on the build results summary page. You can also retrieve your build status page from the menu on the build page if you want to display this in your repo. This will be updated automatically.

Summary
This is just a swift run through of how you can hook up your Github projects to Azure Pipelines and take advantage of the completely free builds. In my view, this could be a handy tool for Open Source projects. I am a bit disappointed with the lack of the visual designer; hopefully, this will get added in the future, but aside from that this is a very nice new feature. We’ve only scratched the surface of what you can do with Azure Pipeline in this article (we haven’t even touched the release management components), so do go and test it out for yourself.
Image Attribution
Trans-Alaska oil pipeline, near Fairbanks flickr photo by amerune shared under a Creative Commons (BY) license
