Deploy Azure Resources Natively in Kubernetes with Open Service Broker
The Open Service Broker API (OSB) project is an industry initiative to create an open, simple and generic way of creating services that can be consumed by cloud-native platforms like Kubernetes, Openshift and so on. Microsoft have released a preview of the Open Service Broker for Azure, which we are going to explore more in this article. First though, let’s understand what OSB and the broker for Azure actually gives us.
Service Broker is in preview so please do bear this in mind before using it. Also bear in mind that the different resource providers are in different levels of stability.
##Open Service Broker for Azure
We’re going to look at this from the context of running a Kubernetes cluster (on-prem, AKS, ACS engine, doesn’t really matter). If you’ve used Kubernetes you’re used to creating YAML files to create your pods, services, ingress etc. and possibly even bundling this all up into Helm charts for easy deployment. When we add Open Service Broker into our Kubernetes cluster what it does is hook into the Kubernetes Service Catalog. If you’re not familiar with the service catalog, this is an API within Kubernetes to allow you to extend the Kubernetes schema with resources of your design, while still having them managed by Kubernetes and following the Kubernetes life cycle.
What this means, is that we can hook the Open Service Broker into Kubernetes and then use standard Kubernetes language to create resources that are offered by the service brokers you implement. In our example, using the service broker for Azure, I can now create things like Azure SQL, Azure Database for MySQL or PostgreSQL and Cosmos DB, other services such as service bus are in early alpha, and more are coming. Not only can I create the resources using Kubernetes YAML, but I can also get the information back from Azure in Kubernetes format, for example, DB credentials are created as Kubernetes secrets.
All this means, that if I need a database resource (other resources to come) for my application, but I don’t want to run SQL server in a Pod and have to deal with backup, resilience etc. then I can just use Azure SQL, but without needing to create and manage the DB outside of my Kubernetes app. We can even take this a step further, and you can include your Azure resource creation inside your Helm package. When you do this, you can deploy your whole application, including all the Azure resources, with a single Helm command. When you decide to tear that instance of the application down, you just run Helm Delete, and the DB gets deleted along with your application (if that is what you want).
##Installation
To get up and running with the Open Service Broker for Azure you need to install both the service catalogue and the Open Service Broker for Azure. I’m assuming you already have a Kubernetes cluster up and running if you don’t then you can read the full walkthrough including creating an AKS cluster here
###Set Environment Variables
The service broker needs to know how to connect to Azure to create resources, so we need to supply it with these details during creation. The easiest way is to set them as environment variables on the machine running the commands to deploy open service broker.
The first thing we need is a service principal that has rights on the subscription we want to create resources. If you don’t have a service principal setup you can create one using the Azure CLI:
az ad sp create-for-rbac --name svc-osba -o table
Note down the credentials; then we are going to set them as environment variables, along with the subscription and AAD tenant ID.
PowerShell
$env:AZURE_TENANT_ID = "<Tenant>"
$env:AZURE_CLIENT_ID = "<AppId>"
$env:AZURE_CLIENT_SECRET = "<Password>"
$env:AZURE_SUBSCRIPTION_ID = "<SubscriptionId>
Bash
export AZURE_TENANT_ID=<Tenant>
export AZURE_CLIENT_ID=<AppId>
export AZURE_CLIENT_SECRET=<Password>
export AZURE_SUBSCRIPTION_ID="<SubscriptionId>"
###Deploy Service Catalog
The service catalogue application is deployed using Helm, so make sure you download and install Helm on your workstation. Once installed, run Helm Init while connected to your Kubernetes cluster to initialise it on the cluster.
Once Helm is installed we can install the service catalogue. The first thing we need to do is add the Service Catalog helm repo to helm by running this command:
helm repo add svc-cat https://svc-catalog-charts.storage.googleapis.com
Then we can install the service catalogue app. The command to run varies slightly depending on whether you are using Role Based Access Control (RBAC) on your Kubernetes cluster. Generally, I would recommend you do, but at this time AKS doesn’t support this.
With RBAC
helm install svc-cat/catalog --name catalog --namespace catalog \
   --set rbacEnable=true \
   --set apiserver.storage.etcd.persistence.enabled=true
Without RBAC
helm install svc-cat/catalog --name catalog --namespace catalog \
   --set rbacEnable=false \
   --set apiserver.storage.etcd.persistence.enabled=true
Wait for the Service Catalog pods to show as running using Kubectl get pods -n catalog once they are we can then install the broker. Note that it can take a little while and you may even see some retries, this is normal as it can take some time to create the persistent volume claim in Azure.

###Deploy Open Service Broker for Azure
As with the service catalogue, we use Helm to deploy this. Again, first, we need to add the Helm repo:
helm repo add azure https://kubernetescharts.blob.core.windows.net/azure
Then we can install the broker its self; this is where we use the environment variables we defined earlier.
PowerShell
helm install azure/open-service-broker-azure --name osba --namespace osba `
  --set azure.subscriptionId=$env:AZURE_SUBSCRIPTION_ID `
  --set azure.tenantId=$env:AZURE_TENANT_ID `
  --set azure.clientId=$env:AZURE_CLIENT_ID `
  --set azure.clientSecret=$env:AZURE_CLIENT_SECRET
Bash
helm install azure/open-service-broker-azure --name osba --namespace osba \
  --set azure.subscriptionId=$AZURE_SUBSCRIPTION_ID \
  --set azure.tenantId=$AZURE_TENANT_ID \
  --set azure.clientId=$AZURE_CLIENT_ID \
  --set azure.clientSecret=$AZURE_CLIENT_SECRET
Check on the status of the pods using kubectl get pods -n osba Once they are up and running we are ready to create resources.

##Deploying Resources with OSBA
Now OSBA is up and running we can use it to create resources in Azure using Kubernetes YAML files. The exact syntax needed to create these resources varies depending on what you are deploying, and you can see the documentation for this here, you can also find example YAML files here. We are going to look in more detail at deploying an Azure SQL database.
When deploying Azure SQL resources, there are two ways to do it; you can either deploy an “azure-sql” resource which creates both the Azure SQL server and database or deploy an “azure-sql-dbms” resource to create the server and then an “azure-sql-database” resource to create the DB. You would do the later when you want to create multiple databases on a single server; you cannot add more databases to a resource created using “azure-sql”. We will keep it simple and use “azure-sql”.
Note that the current documentation is incorrect when naming Azure SQL resources. It seems these have all been updated to use “Azure-SQL-12-0” rather than just “Azure-SQL”, but the documentation has not been updated to reflect this.
We are going to create two things. Firstly the actual SQL resource, and then a binding which creates the Kubernetes secret containing the DB connection details.
###SQL Resources
We create the SQL resources like any other Kubernetes resource, but we use the value of “ServiceInstance” for the “kind” field. In the spec section, we then define the type of resource (“azure-sql-12-0”) and the SKU.
In the properties section, we define all the other information need for creating the DB. At a minimum you need:
- Resource Group
- Location
- DTUs if using standard SKU or above
We also define a firewall rule to open the DB to all IPs (obviously in production you would lock this down better). A full list of properties can be found here.
apiVersion: servicecatalog.k8s.io/v1beta1
kind: ServiceInstance
metadata:
  name: example-sql-instance
  namespace: default
spec:
  clusterServiceClassExternalName: azure-sql-12-0
  clusterServicePlanExternalName: standard
  parameters:
    location: eastus
    resourceGroup: demo
    dtus: 20
    firewallRules:
    - startIPAddress: "0.0.0.0"
      endIPAddress: "255.255.255.255"
      name: "AllowAll"
Note that I have not yet been able to find a way to control the name of the server or database that gets created, this seems to be assigned randomly.
###Binding
Finally, we need to create the binding that creates the secret that contains the DB connection details.
apiVersion: servicecatalog.k8s.io/v1beta1
kind: ServiceBinding
metadata:
  name: example--sql-12-0-binding
  namespace: default
spec:
  instanceRef:
    name: example-sql-instance
  secretName: example-sql-secret
This binding creates a secret called “example-sql-secret” that we can then use within our application to get these details. A contained user is created that has DBO rights on the DB you created; you cannot see the server admin credentials.
###Deployment
Now we have our YAML files created; we can deploy them using the standard Kubernetes create command.
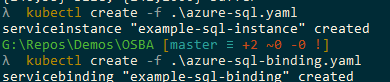
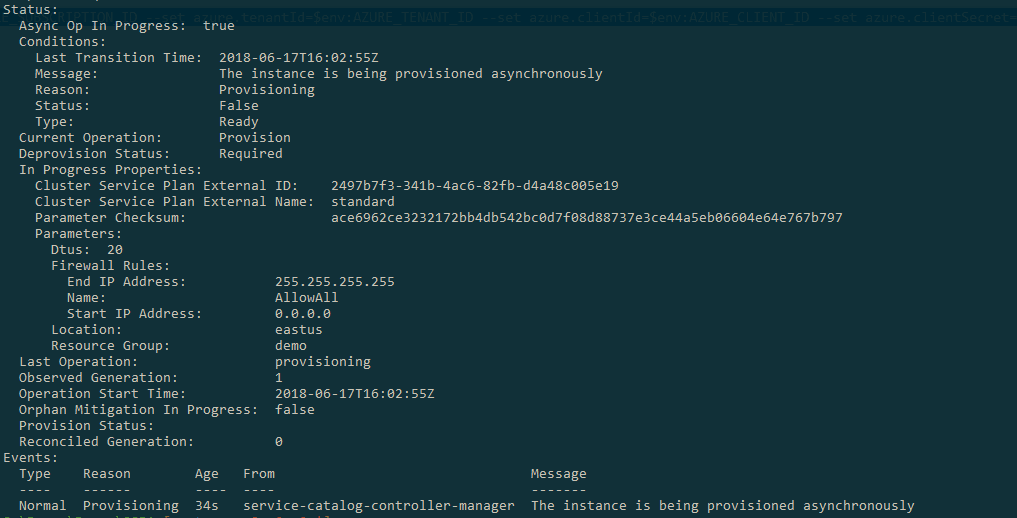
You can then query the status of the DB by using the describe command:
kubectl describe serviceinstance example-sql-instance
This command should come back showing the status, which should be that the resource is being provisioned asynchronously.
You can also check the status in the Azure portal, which should now show your resource group and the SQL server and DB. As mentioned, the names are created randomly.

We can also see that a secret has been created with our DB credentials in it.

If we want to delete the resources, we can do so quickly using standard Kubernetes commands.
kubectl delete serviceinstance example-sql-instance
kubectl delete servicebinding example-sql-binding
###Helm Packages
Now that we can create Azure resources as standard Kubernetes resources we can include them in Helm packages and deploy all the resources from our application in one go. These resources are deployed using Helm in exactly the same way as anything else. Now when you run Helm install
