Add an Admin Tab to Windows Terminal with gsudo
Before Windows Terminal existed, I used to use Cmder as my terminal of choice. It had many features that Windows Terminal now has, and when that came out, I switched over. However, the one thing I did miss from Cmder was the built-in support for having a terminal tab run in UAC Administrator mode. While I’m not advocating for using admin mode in your day-to-day terminal-based work, you sometimes need to elevate for installing software, running commands that require admin rights, etc. In Windows terminal, I needed to either drop out to a separate PowerShell window I used the “run as admin” right-click command on or configure a tab to execute a script that would launch another window as admin. All a bit of a pain.
I revisited this today when I got annoyed again about needing to launch a new window and came across this GitHub issue. On the surface, this is a thread stating that admin mode is not coming to Windows Terminal, but one comment suggests using a tool called gsudo.
gsudo is marketed as a sudo equivalent for windows, making it easier to run individual commands as admin, or the whole shell. This makes it trivial to add an admin tab to Windows terminal.
Install gsuo
The first thing you need to do is install gsudo. If your using one of the package managers for Windows, it is available there:
- Using Scoop:
scoop install gsudo - Or using WinGet
winget install gerardog.gsudo - Or using Chocolatey:
choco install gsudo
Or you can install it from GitHub using this PowerShell command@
PowerShell -Command "Set-ExecutionPolicy RemoteSigned -scope Process; [Net.ServicePointManager]::SecurityProtocol = 'Tls12'; iwr -useb https://raw.githubusercontent.com/gerardog/gsudo/master/installgsudo.ps1 | iex"
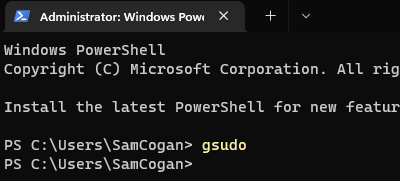
Once installed, restart your terminal and try running the gsudo command. It will give you a UAC prompt, and then your console window is in admin mode.
You can leave admin mode by typing exit. You can also run individual commands as admin by doing something like
gsudo get-process
This will elevate for the duration of the command, then de-elevate.
Setting up a Terminal profile
Now we have gsudo installed, it’s simple to set up a new admin terminal. I’m doing this for PowerShell core, but you could do the same for PowerShell or CMD (or any other process).
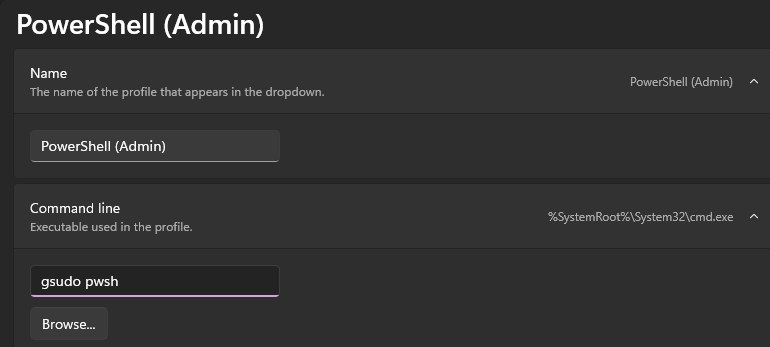
In Windows Terminal, go to the arrow on the tab bar, then Settings. Scroll down to the bottom and click “Add new profile”. You can either duplicate an existing profile or create a blank one. I duplicated the existing PowerShell core one. Change the name to something like “PowerShell (Admin)” and the command line to “gsudo
That’s all you need to do to make that work. You may want to adjust the starting directory or the icon. It can be helpful to have a different colour icon to differentiate admin from non-admin terminals. Conveniently PanosGreg on the GitHub issue also provides a link to some PowerShell icons in red for this purpose.
Save your changes. Create a new tab in the terminal and select your new admin profile. You should get a UAC prompt, and then you are running in admin mode!

