Access Azure Key Vault from your Kubernetes Pods
In any application it is likely you are going to need access to some “secret” data, connection strings, API keys, passwords etc. It is essential that the applications that need them can access these secrets, but that they are also kept secure. One way of doing this is using Azure Keyvault; this is a secure store which can hold secrets, keys and certificates and allow applications to access them securely. Generally, Keyvault Secrets are accessed by the application making a call to the KeyVault API and providing the appropriate credentials (username/password, certificate or managed service identity).
This approach also works when running an application inside a Kubernetes Pod (assuming the Pod has access to connect to KV). Kubernetes also has its method for providing access to secrets. Secrets can be created using Kubernetes and then exposed to the Pods either as environment variables or as volume mounts. This approach has some advantages, as it means the application does not have to call out to external services or authenticate, it just accesses the secrets provided directly to it, and only those secrets. It also removes any requirement for the app to understand how to access key vault.
Up until now, if you wanted to expose secrets stored in Azure Keyvault to a Pod as Kubernetes secrets, you had to copy the secrets and recreate them in Kubernetes, resulting in both extra work and having two sources of truth for these secrets, which can quickly get out of sync.
Microsoft has recently opened up a project on Github to provide a way to mount Keyvault secrets directly into pods, as with ordinary Kubernetes secrets. This solution allows the application to access the secrets as a mount point without any understanding of Keyvault, but still have your single point of truth being the Keyvault repository. In this article, we will take a look at how you can implement this.
Things to Note
Before getting started with this solution, there are a few things to be aware of:
- It’s currently in an Alpha release, so great to play around with, submit feedback and understand how it works, but not production ready yet
- It’s currently only working with Linux containers, no Windows Container support as yet
- You can only mount a single secret per mount point, so if you need to expose lots of secrets you can end up with a pretty complex YAML file
Security
To obtain a secret from Key Vault, your Pod needs to be able to authenticate to Keyvault and prove it has the rights to access this secret. With this solution there are currently two methods to do this:
- Service Principal - creating a standard Azure service principal and granting this access to the vault, then providing the credentials for this to the pod as a Kubernetes secret
- Pod Identity - This is a new project from Microsoft to allow the assigning of a Managed Service Identity to a Pod to allow it to authenticate to services, including Keyault
To keep things simple we are going to use a service principal in this example, but we will be looking at using Pod Identity in a future article. Because we are using a service principal there are a few things we should be aware of when designing our access strategy:
- Your service principal has access to all instances of a specific type (secret, key certificate) in the vault, so we need to scope our Key Vault to ensure that there are only secrets in this vault that the app needs. It is not possible to scope an identity only to be able to see some values of a specific type. You can scope it to only see a specific type, so only secrets, keys or certificates.
- When creating your Pod, you do decide which secrets to mount, so you can only mount specific ones. However, the person creating the Pod can decide to mount any secrets the SP has access to.
- Your Pod has access to the credentials for the Service Principal, so the SP should be explicitly created for this role, and only have access to the specific Keyvault and nothing else (unless you want your app to use this SP for other things)
- Make sure you scope your secret only to the namespace where your application exists so that it can only be accessed there.
Flex Volumes
This solution makes use of a feature in Kubernetes called “Flex Volumes”. Flex Volumes are a feature that allows you to run an arbitrary script to create volumes. Before Flex Volumes, if you needed to create a custom volume type, you had to create a new Storage Provider and get this merged into the Kubernetes repo, which is quite difficult. With the advent of Flex Volumes, we can now create custom volume types just by creating a script that is loaded onto the Kubernetes hosts. This solution makes use of Flex Volumes to create a volume that reads secrets from Key Vault.
Deploy the Solution
There are two things we need to create to be able to use this solution in our Pods:
- The service principal credentials for access to Key Vault
- A daemon set that runs on all hosts. This Daemon set takes care of placing the Flex Volume provider scripts in the right place on the host.
Service Principal
As discussed we are going to use a service principal to allow access to Keyvault. If you haven’t already you will need to go ahead and create a service principal. You can create this with PowerShell or Azure CLI by following these documents:
- PowerShell - https://docs.microsoft.com/en-us/powershell/azure/create-azure-service-principal-azureps?view=azurermps-6.6.0
- CLI - https://docs.microsoft.com/en-us/cli/azure/create-an-azure-service-principal-azure-cli?view=azure-cli-latest
Once your Service Principal has been created, it needs to be granted rights to access Keyvault. There are two places this needs to be done.
Firstly, you need to grant the SP read permissions on the vault its self, using Azure RBAC. You can do this through the portal, by going to the IAM tab on the Key Vault object and adding the SP to the reader role.

Altenatively you can do this using the CLI or PowerShell:
az role assignment create --role Reader --assignee <serviceprincipalid> --scope /subscriptions/<subscriptionid>/resourcegroups/<resourcegroup>/providers/Microsoft.KeyVault/vaults/<keyvaultname>
This permission allows the SP to read the vault object, but not access any of the secrets. In the portal, on the KV object, go to the “Access Policies” tab and then click “Add New”. In here we configure what the SP can access, you can either use one of the predefined roles or select the specific permissions you want. As we only need to read from the KV, the only permission you should grant is “Get” on the appropriate item (key, secret or certificate), and then select the service principal. In my example below I am only allowing the SP to read secrets, and nothing else,

Again, this can also be done by CLI or PowerShell
az keyvault set-policy -n $KV_NAME --secret-permissions get --spn <YOUR SPN CLIENT ID>
Now that our SP is set up to access the Keyvault we need to create a Secret in our Kubernetes cluster that contains the details of the service account. We are going to scope this to our applications namespace to ensure it can only be used there.
kubectl create secret generic kvcreds --from-literal clientid=<sp applicationID> --from-literal clientsecret=<sp password> --type="azure/kv" -n application1
DaemonSet
To use a Flex Volume, the configuration script that is used to create the volume needs to exist in a specific location on the worker nodes. To achieve this, this solution makes use of a DaemonSet (a pod which runs on every node), which mounts the location on the worker node and copies the required files. We need to deploy this DaemonSet before we can start accessing KV in our pods. To do so, run the following command against your cluster.
kubectl create -f https://raw.githubusercontent.com/Azure/kubernetes-keyvault-flexvol/master/deployment/kv-flexvol-installer.yaml
This command creates the DeamonSet using the definition in the project Github repo. If you prefer you can, of course, download the file and refer to it locally.
Once that runs we can check that the DaemonSet pods are running:
kubectl get pods -n kv

Once these pods are all running, we are ready to start accessing secrets.
Pod Configuration
Now that we have everything set up we need to configure our Pods to connect to Key Vault. We do this in our Pod YAML file by defining that we want to use a Flex Volume (or multiple Flex Volumes) and providing the variables that it needs.
The first part of the file is a standard Pod definition, which includes defining that we want to create a volume, and where we want to mount it.
apiVersion: v1
kind: Pod
metadata:
  name: keyvault-demo
spec:
  containers:
  - name: keyvault-demo
    image: nginx
    volumeMounts:
    - name: secret-1
      mountPath: /secret1
      readOnly: true
In this example, we create a volume called “secret-1” which is then mounted to the pod at /secret1, nothing new here.
The interesting part comes when we define the volume. Here we indicate a few things:
- That it is a Flex Volume
- The name of the driver we want to use for the volume (this is the script file that our DaemonSet copied to the host)
- The name of the secret that contains the Service Principal to connect to Key Vault
- A set of option values we want to pass to the driver
The values in the “options” section are what define which Keyvault and Secret to mount. We need to provide the following:
- usepodidentity - defines whether to use a Service Principal or Pod Identity to authenticate. We set this to “false” to use a Service Principal
- resourcegroup - the name of the resource group that contains your Keyvault
- keyvaultname - the name of the Key Vault to connect to
- keyvaultobjectname - the name of the secret to use
- keyvaulobjecttype - whether this object is a secret, key or cert
- keyvaultobectverstion - the specific version of the secret/key/cert in Keyvault you wish to reference. You can find this by looking at the secret in KV; there is a version GUID displayed when you select the version you require
- subscriptionid - the ID of the subscription that contains the Key Vault (this should be ID, not name)
- tenantid - The ID of the Azure Active Directory tenant that holds the service principal (again, ID not name)
  volumes:
  - name: secret-1
    flexVolume:
      driver: "azure/kv"
      secretRef:
        name: kvcreds
      options:
        usepodidentity: "false"
        resourcegroup: "keyvaultflexvolume"
        keyvaultname: "kvflexvolume"
        keyvaultobjectname: "appsecret1"
        keyvaultobjecttype: secret # OPTIONS: secret, key, cert
        keyvaultobjectversion: "b5b8ecffa0344756be898a7170148e7d"
        subscriptionid: "<subscription ID>"
        tenantid: "<tenant ID>"
The full pod definition looks like this:
apiVersion: v1
kind: Pod
metadata:
  name: keyvault-demo
spec:
  containers:
  - name: keyvault-demo
    image: nginx
    volumeMounts:
    - name: secret-1
      mountPath: /secret1
      readOnly: true
  volumes:
  - name: secret-1
    flexVolume:
      driver: "azure/kv"
      secretRef:
        name: kvcreds
      options:
        usepodidentity: "false"
        resourcegroup: "keyvaultflexvolume"
        keyvaultname: "kvflexvolume"
        keyvaultobjectname: "appsecret1"
        keyvaultobjecttype: secret # OPTIONS: secret, key, cert
        keyvaultobjectversion: "b5b8ecffa0344756be898a7170148e7d"
        subscriptionid: "<subscription ID>"
        tenantid: "<tenant ID>"
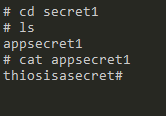
Once the Pod has started, we can exec onto it and confirm that we now have a mount point at /secret1

If we move into this folder, we should see a file with the name of the secret we mounted, in this case, “appsecret1” and if we output the value of that file, we see our secret value.
Further Reading
Kubernetes-KeyVault-FlexVolume
Image Attribution
Containers flickr photo by W. Visser shared under a Creative Commons (BY-NC) license
