Let's Encrypt Certificates in Azure with ACMEBot
Let’s encrypt has quickly become one of the most common ways to generate SSL certificates, due mainly to the fact that certificates are free and easy to automate. Unfortunately, Azure doesn’t have much in the way of built-in tools for issuing let’s encrypt certificates. There is a plugin for Azure Web Apps, but this only works for Windows web applications, not Linux or container-based ones. This plugin also doesn’t help with getting certs for things like Front Door, App Gateway, CDN etc.
ACMEBot is an open-source project by fellow MVP Tatsuro Shibamura, which is intended to help those using Azure to quickly issue and configure Let’s Encrypt certificates to Azure resources In this article we take a look at how this works and how to set it up.
ACMEBot Design
ACMEBot comes in two flavours:
- appservice-acmebot - this is designed to work only with Azure App Services, and allows you to generate certificates and assign them directly to your App service through it’s UI. It supports Windows, Linux and container-based App Services
- keyvault-acmebot - this version creates certificates and stores them in Key Vault rather than assigning them to an app service. This means you have an extra step to configure your resource to use the certificate from Key Vault. However, it means it can support more than just App Services. Any service that supports obtaining a certificate from Key Vault can use this, which includes Front Door, App Gateway, CDN. It also means you can issue more complex certs using SAN’s, apex domains etc.
For the rest of this article, we will focus on the Key Vault version, as this is much more versatile if you are working with more than just App Service. If you wish to use the App Service version, most of what we discuss will still apply.
Service Design
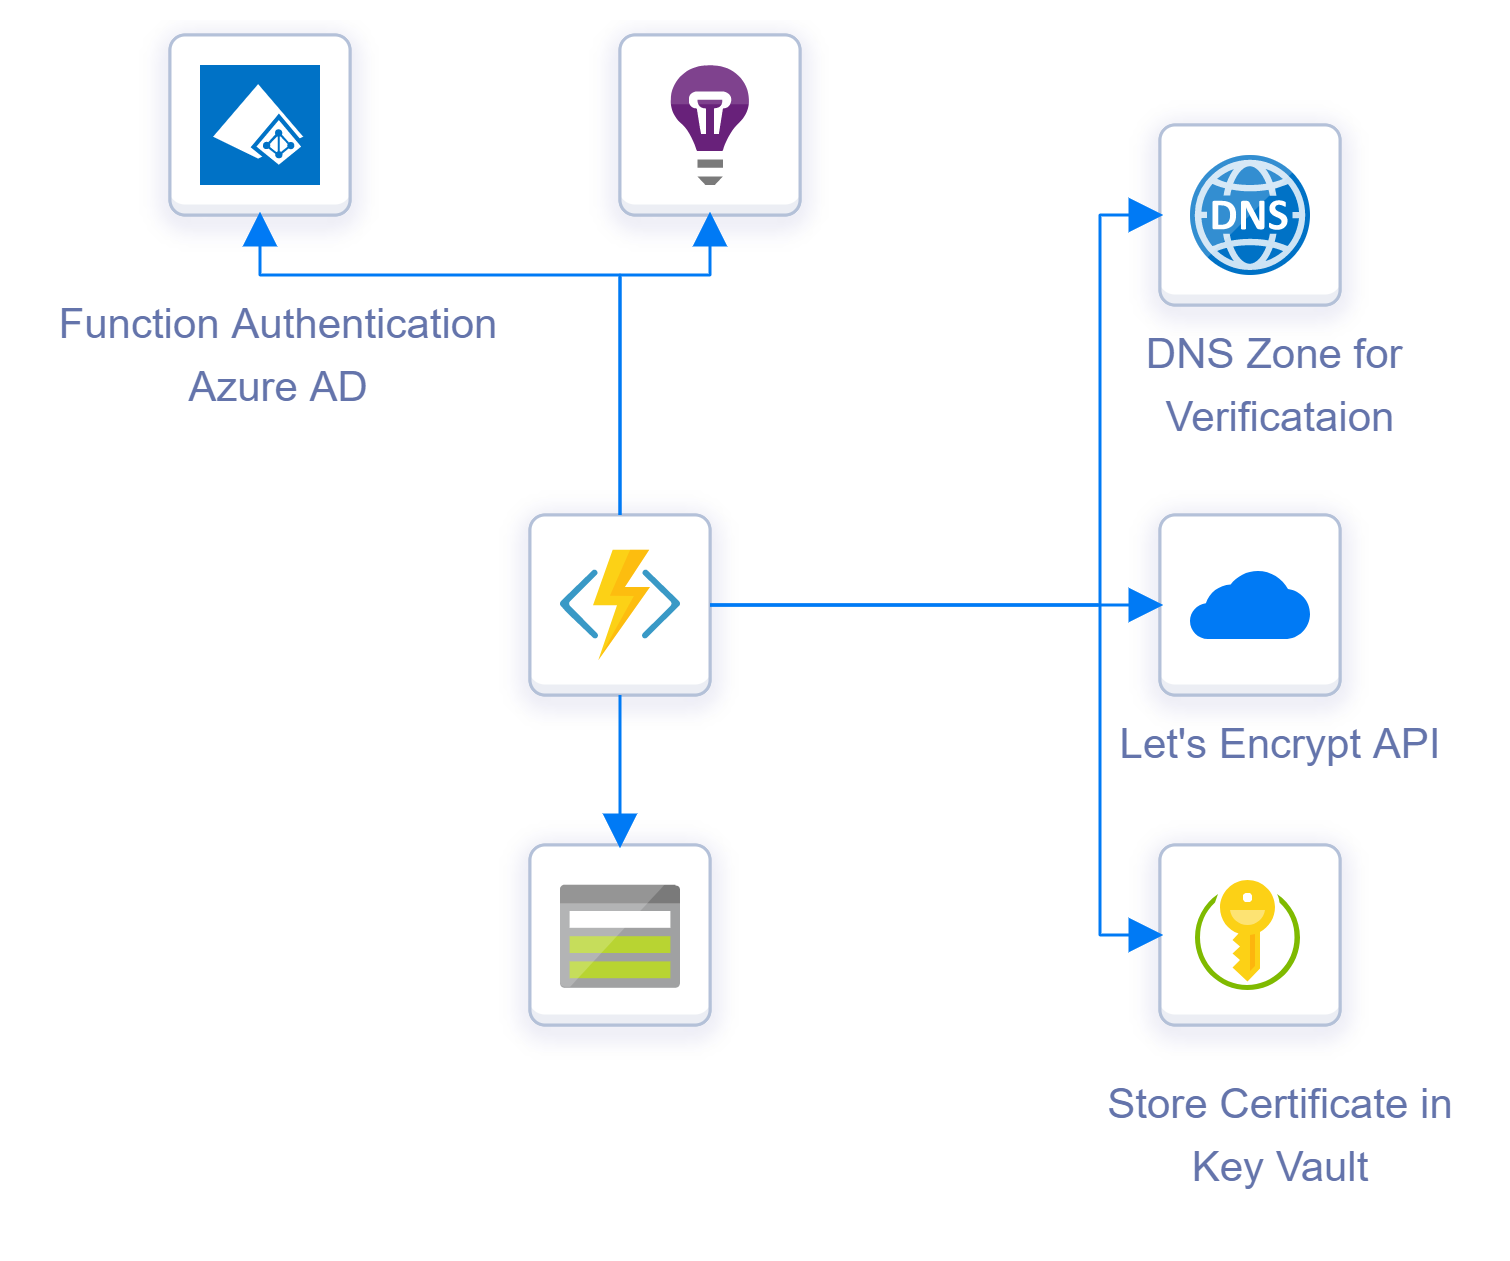
ACMEBot is a reasonably simple solution. It runs as an Azure Function using the consumption plan, so you only pay for when it is used (and get hefty free allowance). Alongside the function, a storage account and app insights instance are also created. A Key Vault is required to store the secrets, you can either have the application create one for you (and set up the permissions for you), or you can use an existing one. Finally, you want to set up authentication on the application, so this can use Azure AD or one of the other options offered by App Service Auth.
How the solution works is that when you hit the Azure Functions “add-certificate” function, it presents a UI for you to enter the certificate you want to create. Once you submit this, several other functions are used to call out and undertake the issuing process. These hit the following resources:
- Azure DNS - ACMEBot uses the DNS validation process to verify ownership of the domain you want to issue the certificate to, to Let’s Encrypt. To do this, the function needs to be able to create and delete records in the Azure DNS zone that hosts your domain. At present, there is not a way to use another DNS provider
- Let’s Encrypt - Once the DNS record is set up, calls are made to the Let’s encrypt API to create the Certificate Signing Request (CSR) and generate and download the certificate
- Azure KeyVault - once the certificate is created it is stored in Azure Key Vault
This process runs when you create a new certificate. What ACMEBot also does is handle certificate renewals. It will detect certificates that are reaching expiry and call out to Let’s Encrypt to renew them and place the new certificate into Key Vault.
Deployment and Configuration
Deploying ACMEBot into Azure is pretty straightforward. The developers have created an ARM template to create all the resources, which you can also find below:
When you click on this you are presented with an Azure Deployment form which requires a few options to be filled in:
- Subscription, Resource Group and Location - to determine where the resources are created
- App Name Prefix - The template uses this to name the resources it creates; it combines this prefix with a uniquely generated string
- Mail Address - the email address you want to use to create certificates. Let’s encrypt requires you to provide an email address when creating certs
- Create with key Vault - if you select true the deployment will create the Key Vault to store certificates for you, if false then it will not, and you will have to configure which Key Vault to use later
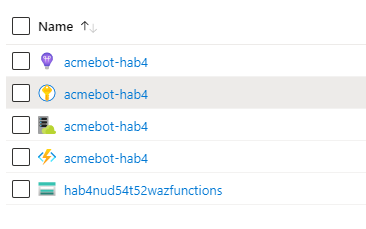
Complete these fields and click “Purchase” to deploy to Azure. Once it completes, you should have resources created that look like this:
Function Authentication
Before we do anything else, we want to set up authentication on the function. At the minute anyone can access and call this. In the function app, go to “platform features” and then in the Networking section, click on “Authentication/Authorization”.
Turn on App Service Authentication then select the provider you want to use to authenticate. Using Azure AD may be the easiest given you are already using it. Complete any options for the authentication provider, then in the drop-down for “Action to take when request is not authenticated” select your provider of choice.
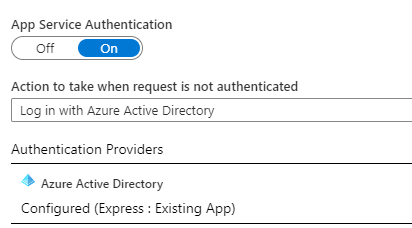
Authentication is now required to access the function.
Granting Permissions
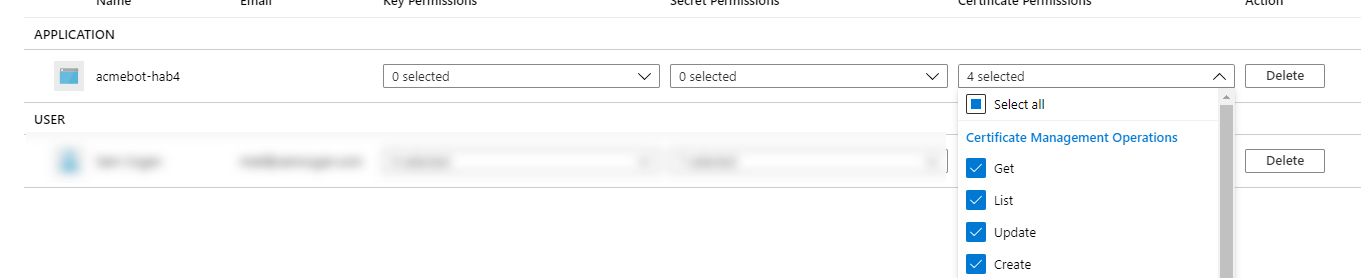
The function has been deployed with managed identity enabled, so we need to grant these rights to the resources it needs to access.
Key Vault - If you had the deployment create the Key Vault instance, there is nothing to do here. If you are using an existing Key Vault, then you need to grant the function managed identity access to the Get, List Update and Create certificate operations in the access policy section of the Key Vault.
DNS Access
For the function to be able to validate your certificate with let’s encrypt you need to grant it access to the DNS zone for your domain. Follow the instructions for your DNS provider here. You can find the Azure DNS details here
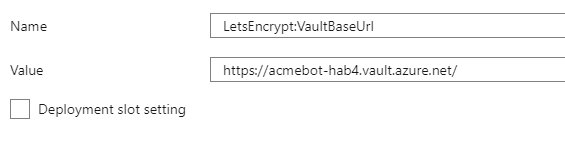
Function Configuration
If you had the deployment create the Key Vault for you, there is nothing to do here. If you created your own Key Vault, then you need to go into the “platform features” section of the function and then go to “Configuration”. Find the “LetsEncrypt:VaultBaseUrl” app setting and set the value to the DNS URL of your KeyVault.
Issuing Certificates
Now we have everything set up we are ready to issue a certificate. To do this go to https://
In the “Domains” box you can enter the domain you want to create a cert for and then click add. If you want to create a SAN certificate, then add each domain one at a time.
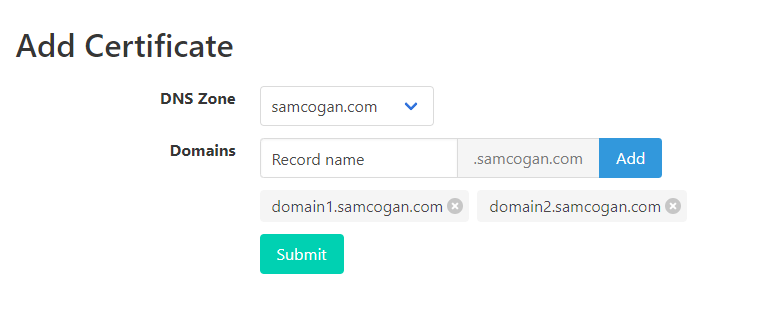
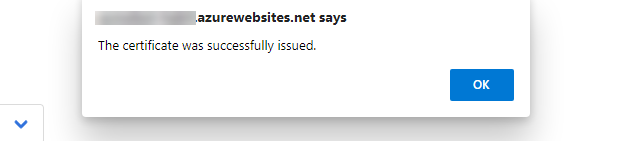
Once you have all the domains you need added you can click submit. This will create the certificate and notify you when it is complete.
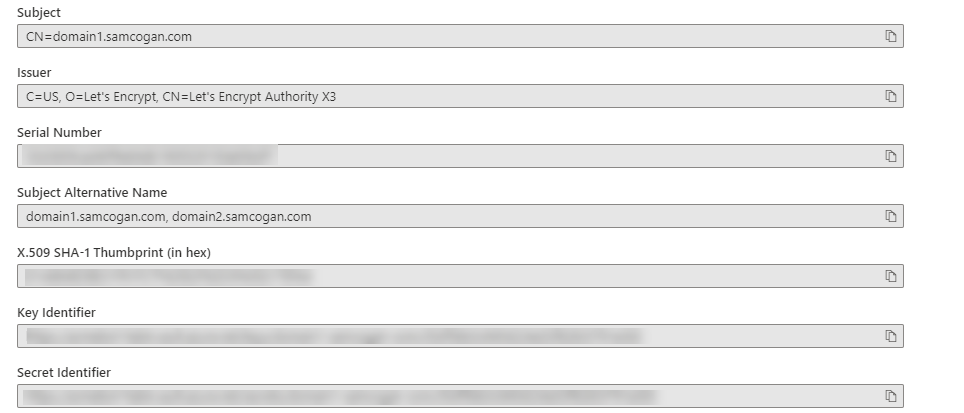
If you check your Key Vault, you will now see a certificate has been created.
Using Certificates
Because we used the Key Vault cert process, these certificates have not been assigned to any resources yet. We can now do this, ideally using resources that support accessing certificates directly from Key Vault (like Web Apps and Front Door), this way they will automatically pick up any renewals of the certificate.
If you wish to use this certificate with a resource that does not support connecting to Key Vault, you can do this by downloading the certificate in PFX format and uploading to your resource. However, this means you will be responsible for updating the certificate when it expires.
