Improving the Terminal Experience when Working with Azure
If your working in Azure regularly at scale then it’s very likely you spend a fair amount of time at the command line using the Azure PowerShell cmdlets or Azure CLI (or both).
This week at the Build conference Microsoft announced: “Windows Terminal” a new command line experience for Windows, which looks very interesting. It’s still in development, but you can download the source from Github and build it yourself if you’re interested in trying it out. From my testing, it does have potential, but it’s not ready for production use yet.
All is not lost however, I have spent the last few years tweaking and customising the Windows terminal to get it how I want. In this article, we’re going to take a look at my command line setup and some of the tools I make use of to improve this experience, which might be useful for you.
I’m doing all of my work on a Windows machine, running Windows 10 (currently release 1903).
Azure Modules
First thing, if your going to be working with Azure from the command line is to get either the Azure PowerShell modules or Azure CLI installed. I have both setup, as some things are only possible through the CLI, especially when working on preview services. I’ve also moved over to the newer AZ cmdlets, rather than the AzureRM ones. If you want to know more about that have a look at this video.
- To install the AZ PowerShell cmdlets follow the steps on this page.
- To install the Azure CLI follow the steps on this page.
Terminal Setup
The default CMD or PowerShell terminals that come with Windows are OK, but there are several third-party terminals available that can enhance your experience. I make use of one called CMDER which is built on top of and enhances another tool called ConEmu. Using CMDER, I get some key enhancements over the default terminal:
- Support for tabs - this is the killer feature, multiple different terminals open in the same window
- Much richer customisation of font, colour and size
- Full screen when needed
- Better copy/paste
- Transparency (which has no real benefit, it’s just cool)
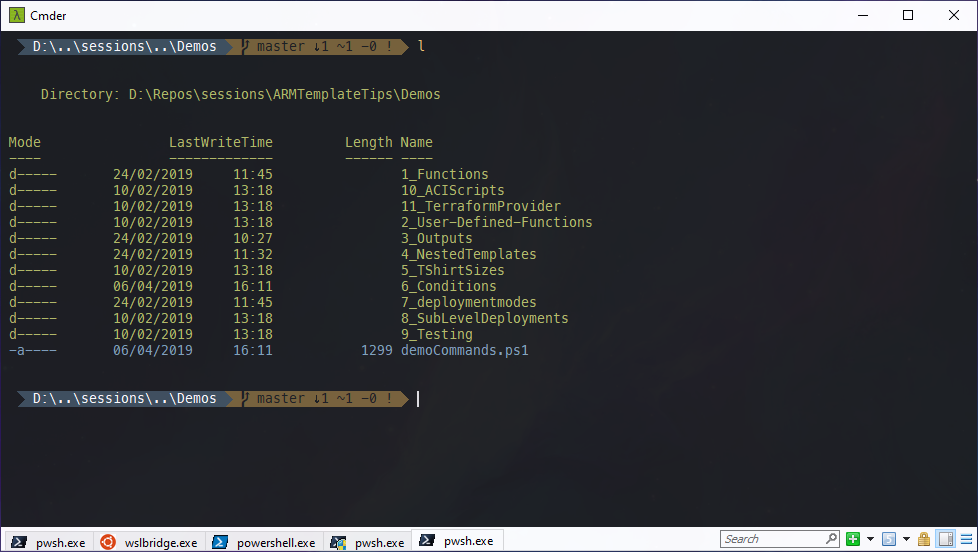
Using CMDER and a few PowerShell modules we can get a terminal that looks like this:
Powerline Font Installation
For the some of the steps we are going to look at later, we need to have CMDER use a font that supports Powerline, which gives us GIT status icons and so on. The easiest way to do this is to install the fonts from this repo using these steps:
Open a cmd prompt, and run:
git clone https://github.com/powerline/fonts.gitCD into the fonts directory and then run:
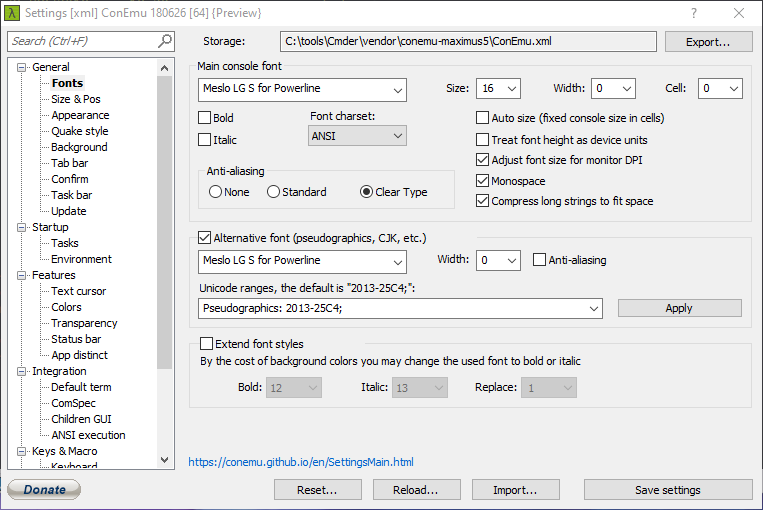
.\install.ps1Open CMDER, click the icon in the top left and go to settings, and then fonts
For both the “Main console font” and “Alternative Font”, select a font that has “Powerline” in the name. Feel free to also adjust the font size to your preference.
Save the settings
AZShell
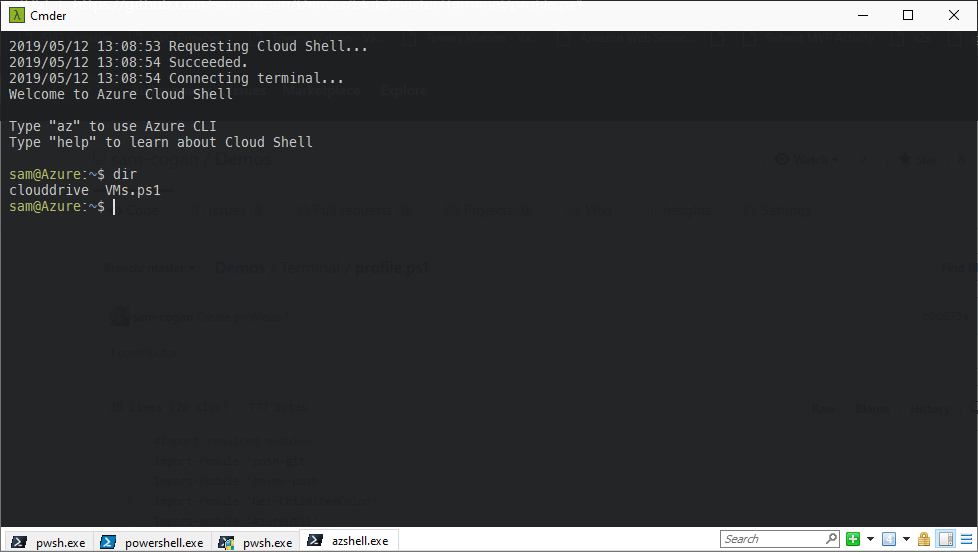
I have recently added the ability to open up an Azure Cloud Shell directly in my terminal; this is useful as it logs me straight into Azure and gives me all the tools available in cloud shell, along with any of my files saved in my cloud drive, directly in the terminal. To do this, you need to install the “AzShell” tool. This project is an experimental open source application from a gentleman at Microsoft called Anders Liu. To install this, go to releases page on his Github repo, download and extract the exe and place it somewhere in your path. We can then use this to open cloud shell as another tab in CMDER.
Task Setup
Each different type of tab you can open, PowerShell, CMD, Bash etc., is a task in CMDER. In my terminal I have the following tasks setup:
- PWSH - PowerShell Core
- PowerShell - PowerShell 5
- Cloud Shell
- WSL - Bash on Windows Subsystem for Linux
- CMD
I also duplicate some of these and set them to run as administrator, so I have the option to launch an admin prompt if required.
Top setup your tasks, click on the icon at the top left of CMDER and go to settings, then startup\tasks. You can see there are some default tasks already configured. If you look at one of the existing tasks you can see there are 3 pieces of information we need to provide:
- Name, this is what the task shows up as in the task list. If you want to group tasks you can use the :: symbols to do this. For example, I group my admin, and non-admin PWSH prompts together as “PWSH::PWSH” and “PWSH:PWSH as Admin” this gives me a selector for “PWSH” and then two tasks under that
- Task Parameters - this is any parameters to feed to CMDER when launching the tasks, I mainly use this to set the icon for the task
- Commands - This is what you want to run when launching the console, so this is the actual command to launch the terminal (cmd.exe, pwsh.exe etc.) plus any parameters you want to provide with it.
Here is an example of my PowerShell core (PWSH) task:
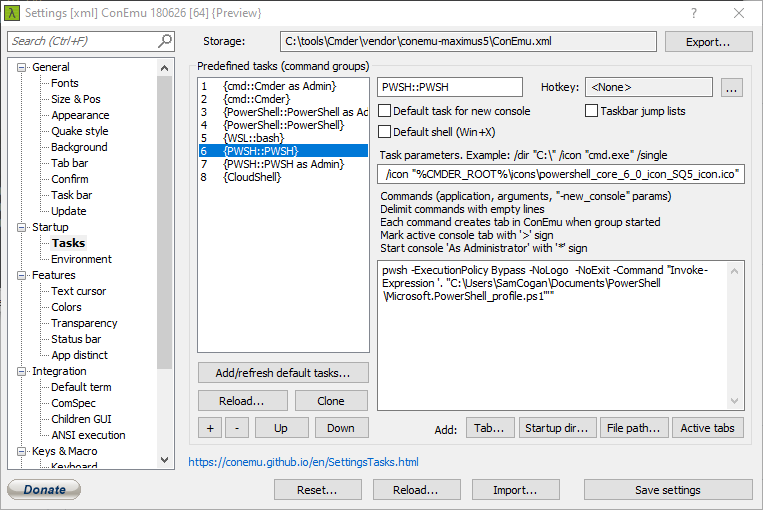
You can see that I am setting a custom icon for this, which I do for most tasks. These do not come out of the box, I have downloaded some appropriate icon files and stored them in the CMDER folder. Then I am launching pwsh.exe with some parameters, the most important of which is setting it to use the required profile at launch, this will become important later.
I’m not going to go through every task here, but if you want to look at how I have set up each of the tasks you can download a copy of all of my settings from github. This downloads an XML file, which you can then go to the import button in CMDER and load.
Customisation
We’ve now got CMDER running, with tasks for each of our favourite terminals. Now we can add some customisation to make them even more useful. For the rest of this article, we are going to focus on PowerShell/PowerShell core as that is where I spend most of my time. In a future article, we will take a look at customising WSL.
Colour Scheme
Out of the box, CMDER ships with several different colour schemes you can choose from. Just go to the icon in the top left, settings, general and then choose a scheme you like from the drop down. You can also find lots more themes online, such as the repository here. Because CMDER is based on CONEMU, any colour schemes for CONEMU will work.
Posh-Git
All of my code, infrastructure as code, documentation etc. lives in Git, so the first tool I install is one called Posh-Git, this provides us with information at the command line about the state of the current repository we are in. It also provides tab completion for Git commands. With Posh-Git installed, when we are in a folder controlled by Git we will see a prompt like this:

To install Posh-Git, you need to use PowerShell Gallery to run:
install-module posh-git
To try it out, we can then run:
import-module posh-git
We will look at updating our profile to load this automatically shortly.
Oh-My-Posh
The next customisation is to install a module called Oh-My-Posh. This module is a port of the popular Linux module Oh-My-ZSH, to PowerShell. This module allows you to theme your prompt with various colour schemes, Git status indicators, Admin status and many other things. To install this, we are again going to use PowerShell Gallery:
Install-Module oh-my-posh
Import-module oh-my-posh
At this point we should see our prompt now has a shiny new theme:

There are a large number of themes to choose from, all of which you can see listed here. To try them out you can run the command:
set-theme <themeName>
For example
set-theme Paradox
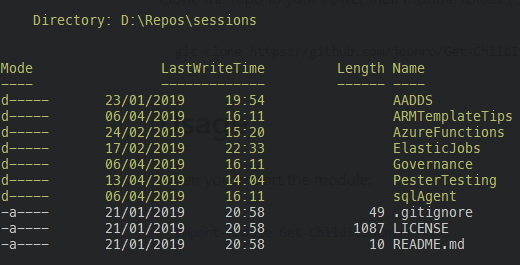
Get-ChildItemColor
This is a simple tool which adds colour coding to the get-childitem command. When you run this command, you get different colours used for folders vs files and different file types. This module can again be installed from the gallery using:
Install-Module Get-ChildItemColor
Import-Module Get-ChildItemColor
Then we can run Get-ChildItemColor to test it out. We’ll look at replacing the default get-childitem commands with this in a moment.
AzureUtil
This is a utility module with lots of handling commands for working with Azure, such as finding empty resource groups, finding non-attached disks, invoking the Azure REST API and more. This module is in the PS Gallery as well:
Install-Module -Name AzureUtil
AzureSaveMoney
This utility allows me to query an Azure Subscription and get a list of unused resources that could be deleted. This is useful for cleaning up my demo subscriptions to make sure I’m not leaving lots of resources lying around not being used. Again this can be installed from the PS Gallery.
Install-Module -Name AzureSaveMoney
Profile Updates
Now that we have installed all our customisations, we want to make sure that they are run on start-up so that console launches configured how we want it. To edit your profile, the easiest way is to run the command below to open directly in VS Code:
code $profile
In my profile I am doing the following:
- Importing the various modules mentioned above
- Setting an alias for the get-childitem commands to use get-childitemcolour
- Setting the oh-my-posh theme
- Defaulting to my repos folder
- Setting the “default user” for oh-my-posh, this removes the listing of the username at the prompt, which I do not like
- setting up some useful functions that I can call with a short alias
My profile looks like this:
#Import required modules
Import-Module 'posh-git'
Import-Module 'oh-my-posh'
Import-Module 'Get-ChildItemColor'
Import-module 'AzureUtil'

#Set Default user for oh-my-posh to avoid username in prompt
$DefaultUser = 'SamCogan'

# Default the prompt to agnoster oh-my-posh theme
Set-Theme agnoster
# Set location
set-location "D:\Repos"

# Ensure that Get-ChildItemColor is loaded
Import-Module Get-ChildItemColor

# Set l and ls alias to use the new Get-ChildItemColor cmdlets
Set-Alias l Get-ChildItemColor -Option AllScope
Set-Alias ls Get-ChildItemColorFormatWide -Option AllScope
Set-Alias dir Get-ChildItemColorFormatWide -Option AllScope

#utility functions

function repos {set-location "D:\Repos" }
function docs {set-location "C:\Users\SamCogan\OneDrive - Sam Cogan\"}
You can also find a copy on Github here.
What’s your terminal look like?
That’s a very brief summary of how I set up my terminal to do day to day work with Azure and PowerShell. I’d love to hear what customisations you are doing or any useful tips and tricks in the comments.
