Create Azure Key Vault Certificates using 3rd Party Certificate Authorities
Azure Key Vault is the default service for storing secrets in Azure; this includes storing certificates. As well as just storing certificates, Key Vault can also be used to create, issue and renew certificates automatically. Initially, this functionality was limited to just certificates purchased through Azure as App Service Certificates, but this is no longer the case. Microsoft has allowed 3rd parties to integrate with Key Vault, and it is now possible to have Key Vault generate certificates from both DigiCert and GlobalSign.
There are several benefits to using Key Vault to generate and manage your certificates:
- A central location for storage of certificates
- Programmatic access to certificates
- Programmatic creation of certificates
- Automated renewal of certificates
- Programmatic re-keying and rolling of certificates
In the rest of this article, we will look at how to set this up using DigiCert as the CA. The process for GlobalSign is very similar, and more details can be found here.
Pre-Requisites
Before we can look at setting up certificate creation, you will need to have the following setup:
- An Azure Key Vault
- A DigiCert Account
- Credit Card Payment setup in your DigiCert Account
Create an Issuer
Before we can create any certificates, we need to create an Issuer. The issuer defined the details needed to connect to our CA (in this case DigiCert), this is our Account ID, Organization ID and API key. To create our issue, we need to retrieve these from the DigiCert portal.
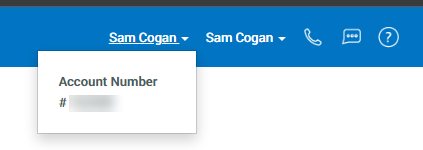
First up, to retrieve your account ID login to the DigiCert portal and look to the top right for your name/company name. Click on the drop-down to retrieve your ID.
Next, the Organization ID can be found by going to the Certificates section and then “Organizations”. Here you should see your Organizations listed. If you see more than one select the one that you wish to generate certs for. In the “Organization Details” section you should see your ID, make a note of this.

To get create an API key go to the “Account” menu on the left, then into “Account Access”, click on the “Add API Key” button to open a wizard for creating an API key. Here you enter the name you want to give the API key and the user you want to associate it with. The user associated with the key determines what rights it has. For our needs, the user will need to have the rights to create certificates.

Once you hit “Add API Key” the key will be created and displayed to you, make a note of this as you will not be able to retrieve it later.
Now we have the details; we can create an issuer. This can be done through PowerShell, Azure CLI or the portal. The commands are slightly different between the two.
PowerShell
$org = New-AzureKeyVaultCertificateOrganizationDetails -Id "<Organization ID From DigiCert Portal>"
$apiKey = ConvertTo-SecureString "<API Key From DigiCert Portal>" -AsPlainText –Force
Set-AzureKeyVaultCertificateIssuer -VaultName "<name of Key Vault>" -IssuerName "<name to identify issuer>"
-IssuerProvider DigiCert -AccountId "<Account ID From DigiCert Portal>" -ApiKey $secureApiKey
-OrganizationDetails $org
CLI
az keyvault certificate issuer create --vault-name "<name of Key Vault>" --issuer-name "<name to identify issuer>" --provider-name DigiCert --acount-id "<Account ID From DigiCert Portal>" --organization-id "<Organization ID From DigiCert Portal>" --password "<API Key From DigiCert Portal>"
Portal
Inside Key Vault, go to the certificates section then click on the “Certificate Authorities” section in the top bar.

Click the “Add” button to create a new certificate authority. In the window that opens fill in the form with the details retrieved above.

Validate Issuer
Once you create the issuer using one of the methods above, you can check it has been created successfully.
PowerShell
Get-AzKeyVaultCertificateIssuer -VaultName "<name of Key Vault>" -Name "<name to identify issuer>"
CLI
az keyvault certificate issuer show --vault-name "<name of Key Vault>" --issuer-name "<name to identify issuer>"
Portal

Issue Certificates
Now we have our issuer created we can issue certificates using this. If you’ve ever issued a self-signed certificate from Key Vault before then, this process is similar, but using our newly created issuer.
One thing to bear in mind - once we start issuing a certificate with DigiSign or Globalsign your credit card will be charged for the cost of the certificate, so do make sure you fill in the details correctly and are ready to purchase.
PowerShell/CLI
Using the command line, creating a certificate is a two-step process. First, we need to create a “policy” which defines what the certificate will look like and then we use this policy to create the certificate.
We create a policy which defines the things we care about in the certificate - the common name, validity period, renewal time, and issuer.
Create Policy
PowerShell
$certificatePolicy = New-AzureKeyVaultCertificatePolicy -SecretContentType application/x-pkcs12 -SubjectName "CN=myCommonName.com" -ValidityInMonths 12 -IssuerName "<name of issuer created previously>" -RenewAtNumberOfDaysBeforeExpiry 60
CLI
Creating a policy in the CLI is a bit more painful as you have to define this in a JSON object. There is a default policy which is mainly of use for self-signed certs, but we can use this to get the right JSON format to edit. To retrieve the default policy run:
az keyvault certificate get-default-policy
This command returns JSON we can edit to fit our needs. The JSON below matches what is defined in the PowerShell section.
{
  "issuerParameters": {
    "certificateTransparency": null,
    "name": "<display name>"
  },
  "keyProperties": {
    "curve": null,
    "exportable": true,
    "keySize": 2048,
    "keyType": "RSA",
    "reuseKey": true
  },
  "lifetimeActions": [
    {
      "action": {
        "actionType": "AutoRenew"
      },
      "trigger": {
        "daysBeforeExpiry": 60
      }
    }
  ],
  "secretProperties": {
    "contentType": "application/x-pkcs12"
  },
  "x509CertificateProperties": {
    "keyUsage": [
      "cRLSign",
      "dataEncipherment",
      "digitalSignature",
      "keyEncipherment",
      "keyAgreement",
      "keyCertSign"
    ],
    "subject": "CN=myCommonName.com",
    "validityInMonths": 12
  }
}
Once you create the JSON, save it to a file, we can use this in the create command.
Create Certificate
Now we have our policy; we can use it to create a certificate.
PowerShell
Add-AzureKeyVaultCertificate -VaultName "<name of Key Vault>" -CertificateName "<display name>" -CertificatePolicy $certificatePolicy
CLI
Here we use the @{file} syntax to retrieve the policy file we created previously.
az keyvault certificate create --vault-name "<name of Key Vault>" -n "<display name>" -p @{/path/to/json/file}
Portal
Using the Portal, there is no need to create a policy separately. Go to the certificates section and click “generate/import”.

Then complete the wizard with the required details. Be sure to select your DigiCert issuer in the CA section by selecting “Certificate issued by an integrated CA” and then the issuer you created.

Issue Certificate
Now we have created a certificate it will start the issuing process. If you look in the portal, you will see it displayed in the in-progress section as disabled.

If you click on the request, you can see more details of what is occurring, and if there are any errors.

Once KeyVault contacts DigiCert and places an order you will need to go through the usual process to validate ownership of the domain you are creating the cert on and approve the order. Once that is completed you will see the status of the certificate order change to completed in KV.
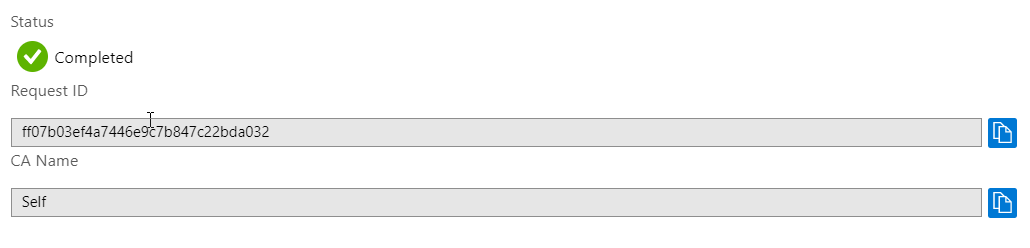
You will find the certificate has now been issued and created in Key Vault ready for use.

Image Attribution
padlock flickr photo by zimpenfish shared under a Creative Commons (BY-SA) license
