Azure Terraform Extension for Visual Studio Code
I’ve been doing more work with Terraform and Azure recently, particularly around deployments that need to deploy both Azure and non-Azure resources at the same time. In particular, this has focussed on creating AKS clusters and then using Terraform to set these up and deploy all the standard services on top of the cluster. I’ve also been live streaming some of this work on Twitch so if your interested in watching how this is done, or want to ask a question, please do join me.
When I started this work, I stumbled across the Azure Terraform extension for VS Code. This is a Microsoft extension, but I hadn’t seen it before, and I’ve found it very useful during the development process. What this extension does is provide integration between VS Code and Terraform running in Azure Cloud Shell. It provides commands for all the standard Terraform functions, but where it is different is it runs all these commands in Cloud shell, not on my local machine. My Terraform files are on my machine (in this case checked out from Git), but when I run “Azure Terraform Plan”, the extension takes care of syncing the latest copy of the file up to cloud shell, and then running the “Plan” command directly in Cloud Shell.
By utilising Cloud Shell, I get several benefits:
- I don’t have to care about authenticating to Azure in my Terraform files; this is taken care of for me by Cloud Shell. No need to create service principals or set up a provider with credentials. I can get up and running with Terraform very quickly
- My commands execute in Cloud Shell, so if I have any connectivity issues from my local machine, they should not impact things
- Cloud Shell is kept up to date with the latest version of Terraform and any dependencies
- All my Terraform files are synced with my storage in Cloud Shell
One thing to bear in mind, however, is that this is very much designed as a development tool, to help you create your Terraform scripts in the first place. This is not generally the approach you would use to run deployments in production, particularly if you need governance around your process. Moving to production would usually involve checking the files you created using VS Code and this extension into version control and building a proper pipeline. Given all that, let’s take a look at how to get set up.
Pre-Requisites
There are a few things you need to have installed to use this extension:
- Visual Studio Code (obviously)
- Node.js 6.0 or higher - this is needed to run Cloud Shell in VS Code
Optionally, you might want to add some optional components that make life better:
- Terraform - yes I did say all commands run in Cloud Shell, so you don’t need this, but if you want the option to run some commands (like validate) locally then it can be useful to have it installed, but it is optional
- Terraform VS Code Plugin - The standard VS Code plugin that gives you auto-completion, syntax highlighting, linting etc.
- GraphViz - This is entirely optional, but if you want to use the visualisation feature you will need it
Extension
Once all the pre-requisites are installed, we can install the extension by searching for “Azure Terraform” in the VS Code plugin gallery, or going to this page.
Once the plugin is installed, open up an existing Terraform project, or create a new one. Make sure you open the containing folder in VS Code, as it is this folder that gets created on your Cloud Drive.
When you are ready to start running your project, press the VS Code command keys (ctrl shift P on Windows) and look for “Azure Terraform Init”. Run this, and VS Code will ask you if you want to open Cloud Shell, click OK.

If your account is connected to more than one Azure AD tenant, then VS Code will ask you which tenant to connect to, pick the appropriate one.

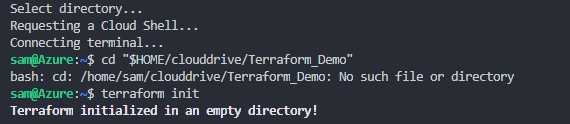
You will see in the Shell that it tries to CD into your project directory in Cloud Shell but fails as it does not exist. It will then create the directory, and you will see a message indicating “Terraform initialized in an empty directory!”.
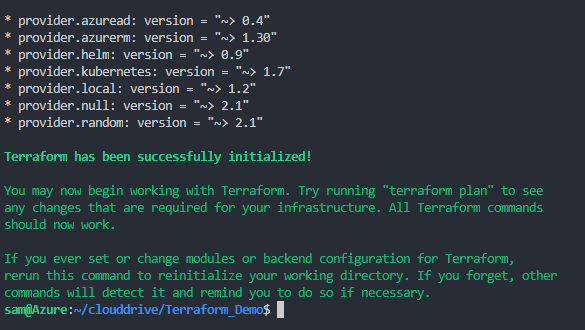
At this point, the plugin has created your directory in Cloud Shell, but to initialise Terraform we need to rerun Init. So again press the VS code command keys, and go to “Azure Terraform Init”. This time you will see it CD into your directory and then run init, which installs all the required Terraform Modules. You now have Terraform initialised and all your files in Cloud Shell.
The Cloud Shell console will remain open, so you can run manual commands to check your files if you wish.

That was all the setup there is. Now, whenever you run one of the Azure Terraform commands VS Code will sync the latest version of your files to Cloud Shell and then run the requested Terraform Command. The extension supports the following standard Terraform commands:
- Init
- Plan
- Apply
- Validate
- Refresh
- Destroy
Additional Commands
As well as the 6 commands listed above, this plugin also provides some extra commands:
Azure Terraform Visualize
If you installed the GraphViz pre-requisite, you can use this command to generate a visual representation of your templates. This command runs locally, not in Cloud Shell. Once you run it, it will seem to not do anything for a while, but eventually, it will create a png with a graph of your deployment.

I’m not yet sure how useful this feature is, but it is a helpful tool to have
Azure Terraform Push
This command triggers a push of the latest versions of your files up to Cloud Shell if you wish to trigger this outside of the other commands
Azure Terraform Execute Test
This command allows you to run any tests you have set up against your Terraform code. It has two values:
- lint - this will run tests to check the formatting of the code
- e2e - this will take your Terraform code, and the settings in your variables file and actually run a deployment, test everything works, and then destroy the resources, so a full end to end test
