Azure Virtual Machine Scale Set Improvements
At Microsoft Ignite this year, Microsoft announced several improvements to VM scale sets.
- Choose images from custom image galleries
- VM Orchestration
- Instance Protection
- Scale In Policies
- Termination Notification
Today we are are going to delve into these new features and see how they work.
Choose an image from a custom image gallery
This is a relatively simple, but welcome change. When you create a new scale set using the Azure portal, you have the option to select both standard gallery images and images from custom image galleries.

VM Orchestration (Preview)
Scale sets now have a new setting that is configured at deployment time called “Orchestrator”. The orchestration setting has two options:
- Scale Set VMs - this is the standard model we are used to where VM instances are created and managed by the scale set, all instances use the same VM size and image
- Virtual Machines - in this mode, you create individual VMs and explicitly add them to the scale set at creation time. This allows you to have multiple different VM sizes and configurations in a single scale set, but to manage them at the scale set level.
Using VM Orchestration Mode
To use VM orchestration mode, you first need to create an empty scale set configured in this mode. To do this in the portal, you need to use the preview creation wizard. If you go to create a new scale set, you should see a purple bar asking if you want to use the preview experience.
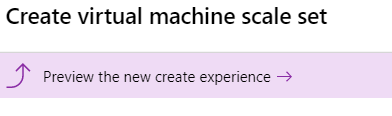
Once you click on this, you should now have the option to select the orchestration mode in the wizard.

Select “Virtual Machines” and proceed with the rest of the wizard to create the scale set.
Adding VM’s is done as if you were creating a stand-alone virtual machine, however, in the “availability options” section, where you would typically select to use an availability set, we have a new option to use a scale set.
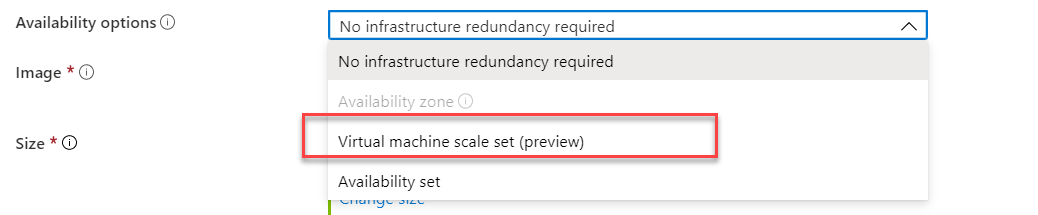
Once you pick that you can then select the scale set for the VM to be created in.

You will notice that after you pick the scale set, you still have all the standard VM creation options. This means that each VM being orchestrated by the scale set can have different sizes, images, networks etc.
If we now go and look in our scale set, we can see a new VM appear in the instances list in the creating state. Once it is ready, we will be able to manage it.
Instance Protection (Preview)
Instance protection allows you to be able to protect some of your instances in the scale set from having scale set operations undertaken on them. This might be something you need to do to protect machines that are undertaking long-running tasks, or if you’ve specialised individual machines (manually or programmatically) to do certain things. Using instance-level protection, you can stop these machines being deleted, updated, scaled etc.
I suspect most use cases, for instance protection are going to be using it programmatically. When your application is allocating work to scale set nodes, it can look to turn on instance protection for the duration of long-running tasks etc.
There are two modes, for instance protection:
- Protect from scale-in - as the name suggests, this only protects the instance from being deleted by an automated scale-in action (trying to shrink the scale set size)
- Protect from scale set actions - In addition to protecting from scale-in, this also protects the instance from being automatically upgraded, re-imaged and deallocated
Note that neither option will protect instances against user-initiated actions, these will be allowed. Instance protection is only blocking automated activities.
Enable Instance protection
Instance protection can be enabled using REST, PowerShell and CLI.
PowerShell
Update-AzVmssVM `
  -ResourceGroupName "myResourceGroup" `
  -VMScaleSetName "myVMScaleSet" `
  -InstanceId 0 `
  -ProtectFromScaleIn $true `
  -ProtectFromScaleSetAction $true
CLI
az vmss update \
  --resource-group <myResourceGroup> \
  --name <myVMScaleSet> \
  --instance-id 0 \
  --protect-from-scale-in true \
  --protect-from-scale-set-actions true
Scale In Policy
Scale in policies are a new feature that lets you decide the order in which VMs are removed from the scale set when it scales in. There are now three options:
- Default - this picks the VM to be deleted based on ensuring a balance of VMs across availability zones and fault domains, if there is no obvious candidate then it just picks the VM with the highest instance ID
- NewestVM - this still attempts to balance across availability zones, but then chooses the newest VM to be removed
- OldestVM - similar to NewestVM, but picks the oldest VM to remove
Note that any VMs protected with instance protection will not be removed regardless of the policy.
Choosing Scale in policy
At present, the scale in policy can only be set using the rest API or ARM template. The syntax for ARM template is below:
"scaleInPolicy": {
      "rules": ["OldestVM"]
}
Termination Notification
VM’s in a scale set can now receive notification of impending termination and allow a pre-defined delay to this termination to perform essential operations before termination.
This notification is provided through the Azure Metadata service on the VM, which as a URL you can call local on the VM to get information. If you’re not familiar with this service, check out my previous postt on this.
Enabling Termination Notifications
Termination notifications can be enabled at creation time, or on an existing scale set. This can be done using the Rest API or PowerShell using the TerminateScheduledEvents flag.
New-AzVmss `
  -ResourceGroupName "myResourceGroup" `
  -Location "EastUS" `
  -VMScaleSetName "myScaleSet" `
  -VirtualNetworkName "myVnet" `
  -SubnetName "mySubnet" `
  -PublicIpAddressName "myPublicIPAddress" `
  -LoadBalancerName "myLoadBalancer" `
  -UpgradePolicyMode "Automatic" `
  -TerminateScheduledEvents
When creating the scale set, the timeout for the termination event is set to 5 minutes. If you want to change this, you can update the scale set to do this.
Update-AzVmss `
  -ResourceGroupName "myResourceGroup" `
  -VMScaleSetName "myScaleSet" `
  -TerminateScheduledEvents $true
  -TerminateScheduledEventNotBeforeTimeoutInMinutes 15
This command changes the timeout to 15 minutes. This means the scale set will now wait 15 minutes before it terminates, or until it receives confirmation from the application that it can terminate early.
Receiving Termination Notification
To receive the termination notification, the application running in the scale set will need to query the metadata URL. When querying the metadata URL, if termination is pending, then a termination event response will be provided that looks like this:
{
    "DocumentIncarnation": {IncarnationID},
    "Events": [
        {
            "EventId": {eventID},
            "EventType": "Terminate",
            "ResourceType": "VirtualMachine",
            "Resources": [{resourceName}],
            "EventStatus": "Scheduled",
            "NotBefore": {timeInUTC},
        }
    ]
}
The application that queried the metadata is now aware that a termination event is happening, and when. The application can decide what to do to ensure that the application terminates cleanly. Once it has finished and is ready to terminate, it can send a post request to the metadata API to declare it is prepared to terminate. If this message is not submitted within the timeout window, then the instance will terminate anyway.
